You are using an out of date browser. It may not display this or other websites correctly.
You should upgrade or use an alternative browser.
You should upgrade or use an alternative browser.
How to make this profile
- Thread starter hamsey
- Start date
tjbnwi
Member
- Joined
- May 12, 2008
- Messages
- 7,269
Panel raising cutter.
https://www.rockler.com/raised-pane...4R2nLLoun9UmJRCfCCqhCRDIpjYTCv5waAqF4EALw_wcB
Tom
https://www.rockler.com/raised-pane...4R2nLLoun9UmJRCfCCqhCRDIpjYTCv5waAqF4EALw_wcB
Tom
semenza
Member
And if you search for Shaker raised panel bit you can find them in varying overall diameters and angles. I have one that cuts about an inch in radius and is close to a 45 degree angle. It would be perfect for what you show. Unfortunately it does not seem to be available anymore. But I did see others that are similar.
Pretty sure it was from MLCS (? no name on package) #8672.
Seth
Pretty sure it was from MLCS (? no name on package) #8672.
Seth
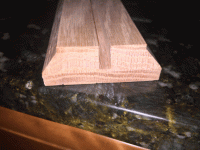
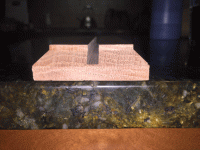
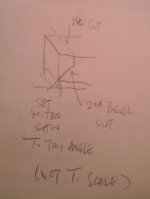
If it's a one-time task, and you don't plan to buy a bit, you may try this with a miter saw that has the trench/dado cut capability:
Make a straight cut on the top
Flip the work and make a bevel cut to meet the first cut.
Try it on a 2x4 first to see if it can work.
Make a straight cut on the top
Flip the work and make a bevel cut to meet the first cut.
Try it on a 2x4 first to see if it can work.
Attachments
Packard
Member
I would make this entirely on the table saw.
I would cut two shallow cuts for the flat section on the top.
I would tilt the table saw blade to 45 degrees and take the 45-degree cuts.
I would use a dado head to cut the center slot. (I might do this cut first.)
Blade depth is going to be by trial and error, but you should be able to get very close just by calculation.
Paul_HKI said:As per ChuckS's suggestion, but on the table saw.
Yes, a table saw will work, too. (I just happen to have a Kapex, which in the past has allowed me to make very precise trench and bevel cuts).
Packard
Member
On the table saw it is just three setups. You could rip off a few lengths and then cut to length as needed.
Unless you have a powerful shaper and get a custom shaper blade, this is going to require more than one setup for the router too.
You will need one setup for the 45s and one for the center groove. If you make setup blocks for the saw, those will go quickly.
It does not look particularly challenging for the table saw. Not much more than making Shaker rails and stiles on the saw, which I do all the time. And with the rails and stiles the fit to the center panel has to be rather precise and the fit of the stub tenon to the groove has to be exact for both thickness and depth. I can't imagine the requirements for your profile will be much more demanding than that.
I will also add when you are using a panel raising bit to make such heavy cuts its best to set up the table saw anyways to remove as much of the waste as possible or you will need to make several shallow passes with the router. Otherwise you are going to be pushing any router way beyond its limits. So if you can get it all done on a table saw you are probably better off in this situation.
Packard
Member
Also, it is really easy to center the groove when working on the table saw--probably easier than doing it with a router.
- Joined
- Oct 16, 2015
- Messages
- 5,615
It doesn't show very well because it wasn't the intent of the pic that I cropped this from, but I saved the mock-up I made of a similar profile last summer. I attached it to the end of my miter station as a shelf for the Shaper workstation.
It was done on the router table with a 30 degree bevel bit. It took a few passes of raising the bit to get the flat section at the top, because it is wider than the bit can handle.
This was a edge profile on a solid white oak top of an entertainment center wall.
It was done on the router table with a 30 degree bevel bit. It took a few passes of raising the bit to get the flat section at the top, because it is wider than the bit can handle.
This was a edge profile on a solid white oak top of an entertainment center wall.
Attachments
Similar threads
- Replies
- 16
- Views
- 568
- Replies
- 4
- Views
- 592


