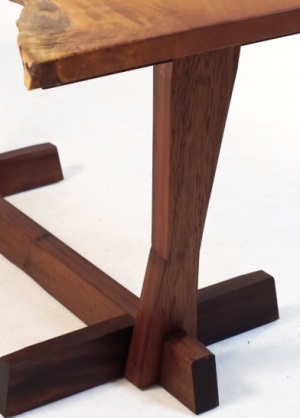
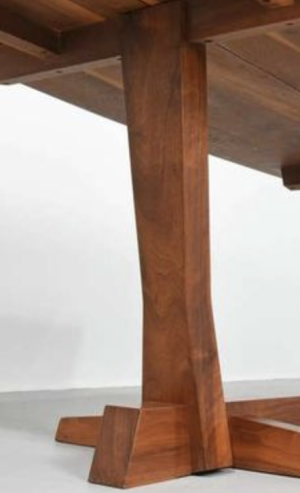
How would you make this?

smorgasbord

Member
Joined
Jan 7, 2022
Messages
1,298
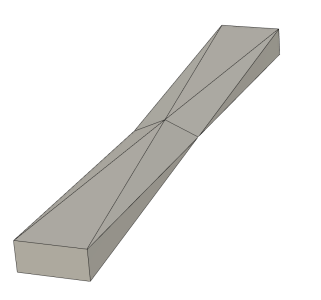
Here's the end product:
Screenshot 2025-09-06 at 10.21.14 PM.png

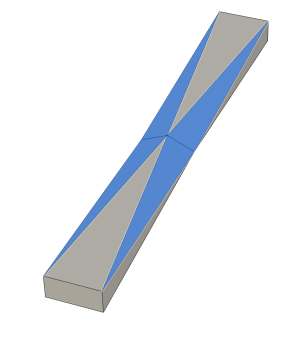
It's a rectangular block 45mm x 100mm x 300mm (say).


Essentially, I want to cut the faces in blue:
Screenshot 2025-09-06 at 10.21.57 PM.png
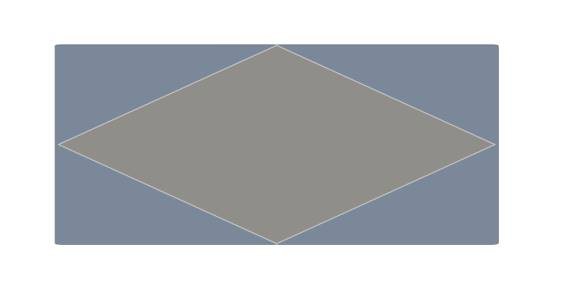
From the end, if you could see the middle, it'd look like:
Screenshot 2025-09-06 at 10.23.39 PM.png
The ends remain 45x100, but the middle is that parallelogram that fits inside that 45x100 envelope.

Here's another view:
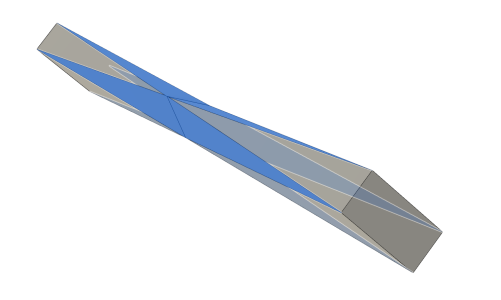
Screenshot 2025-09-06 at 10.23.26 PM.png

If I were only doing half, it'd look like:
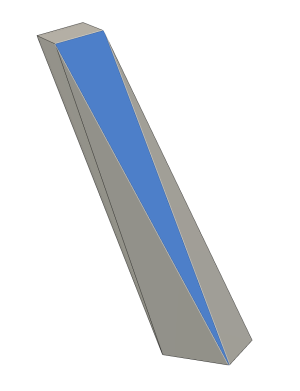
Screenshot 2025-09-06 at 10.32.31 PM.png

I'm thinking bandsaw with some kind of sled, but not sure how to calculate what angles to position the piece at. Each blue triangular face is flat, so I think if I line things up right I can just push the sled though. But calculating angles and then jigging up are my challenges.

Anyone up for guiding me?
 
I would make it in two pieces and join them in the middle after making the taper cuts on the table saw. A couple of dominoes or 3 dowels to strengthen the butt joint.

Special jigs and the jointer might work also. But two sections, definitely.
 
Router sled.

Simple kind with a flat platform and generous slot down the middle rather than constricting rails.
Need a stop that takes into account the router base and bit sizes.

You’ll need four different jigs that hold the ends of the stick. Only two if you make the jigs symmetrical so they can be inverted to hold the work for the opposite end (end referring to the section from the midpoint intersection out to the actual end). Since you are working with cad it she fairly easy. Hard part will be figuring out the best way to hold the ends. Since the ends will not be coplanar with the router sled the mortises in the holding jigs will have to be larger or…?

Finish up with psa sandpaper on a hard flat platen. Cut the abrasive into small strips and apply in a chevron pattern to allow some space for waste dust to accumulate. Since there is no “give” from the platen without the chevron dust will quickly accumulate and prevent the “sander” from being coplanar with the desired plane.
Or, keep a stiff brush on hand to wipe the dust of the abrasive every other stroke.
 
…I think you could do it with just two end jigs.

But forgot to mention above that the workpiece has to be longer than final to account for the stock that is buried in the end jigs.

Mount the work and cut one triangle.
Roll the workpiece and cut a second triangle on the same end.

Swap the workpiece end for end and repeat above.

Then remove the end jigs and turn them around but keeping them on the made ends of the router sled.
Now the four remaining cuts can be made on the square edges as above.
 
I predict that any solution that does not include parting the piece in half prior to machining and then reassembling afterwards will require extreme craftsmanship and likely will betrayed by the smallest lapse there of.

Show this drawing to an experienced machinist and ask his approach. I suspect he will agree: 2 pieces and assemble.

Note: The pictured component more resembles a machined part that a woodworking part, which is why I suggested showing the images to a machinist.
 
I don't think I want to risk making this in two pieces, as the leg is very structural.
I may just do the Nakashima Conoid thing, as shown in this post:

Basically, just trim off the edges into a straight-line hourglass. Or, maybe just leave it rectangular. Sometimes doing less is best.
 
Turn the flat surfaces as indicated by the blue sections, into continuous curved surfaces. I believe a custom template attached to the work piece and run through either a router table or a shaper would work.

However, the abrupt angle in the middle will be an issue if made in one piece.

The same template concept could make the flat surfaces but would yield a radius in the middle. That could be cleaned up with a chisel, jack plane or a file. To make it look perfect will require skill, however.
 
I don't think I want to risk making this in two pieces, as the leg is very structural.
I may just do the Nakashima Conoid thing, as shown in this post:

Basically, just trim off the edges into a straight-line hourglass. Or, maybe just leave it rectangular. Sometimes doing less is best.
I don't think I would worry about the two-piece issue, since the load is straight down. I would, however, do the joinery first. Lay out the diamond shape, to be sure of the placement, then you still have nice square faces to reference.
 
The leg is at a 65º angle to the horizontal, so the force isn't in-line with the leg.

I'm going to do the Nakashima pinch. Then I might do another pinch on the thickness after trying it out on a piece of scrap.
 
Back
Top