I need some elegant door stops

Steve1

Member
Joined
Jul 5, 2017
Messages
517
Location
Southwestern Ontario
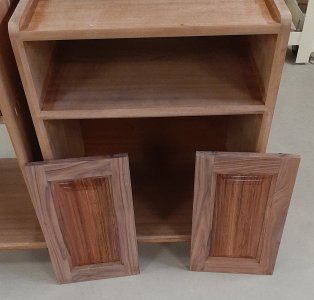
I am working on a set of nightstands with inset doors.
I realize now that I will need a set of hardstops mounted to the lower and upper crosspiece as stops for the doors.
I have some Bubinga and Pau Ferro that I could make some rectangular blocks, but don't really like how rectangular blocks will look.
I have some 1-1/4" diameter bronze bar that I could make something like THESE FASTCAPS, maybe with an O-ring groove on them as a bumper --- a little more elegant.
I know I am over-thinking this, but just the same, anybody got some ideas for elegant door stops ?
 

Attachments

  • Nightstand Doors.jpg
    Nightstand Doors.jpg
    659.1 KB · Views: 26
If you position the stops at the top of the doors instead of the bottom then they won’t be seen.
My thought too. And the FastCap ones come in a few colors so even less conspicuous.

Addendum: I will amend that, just brown, white or clear. But if tucked up above, it will be out of sight except when you are doing your nightly prayers.

 
I have done this dozens of times, often with bifold doors, and pocket doors. The adjustable offset Fast Cap units, that Packard showed work well. It is very often helpful to have stops at the top and bottom. The closing tension of the hinges can pull the rest of the door deeper into the cabinet, if used only at one or the other.
 
I have done this dozens of times, often with bifold doors, and pocket doors. The adjustable offset Fast Cap units, that Packard showed work well. It is very often helpful to have stops at the top and bottom. The closing tension of the hinges can pull the rest of the door deeper into the cabinet, if used only at one or the other.
I agree, even though mine are not big doors, best with stops at top and bottom.

EDIT: But I suppose just one set of stops hidden under the upper shelf would be an elegant solution.
 
Last edited:
I don't think this method is for me, but I did find an interesting idea on Youtube.
He finds that one magnet in the door and one magnet in the cabinet makes the magnets line up with centers exactly aligned (as opposed to one magnet and one steel striker, which does not position the door as repeatably, according to this fellow.

Magnet Stop.jpg
 
What I like about the FastCap system, is the ease, and solidity of the adjustments for depth. I have the same type of system on my miter trimmer and it has not gone out of adjustment in over 30 years (though the last 10 years it has seen light usage.)
 
I have done this dozens of times, often with bifold doors, and pocket doors. The adjustable offset Fast Cap units, that Packard showed work well. It is very often helpful to have stops at the top and bottom. The closing tension of the hinges can pull the rest of the door deeper into the cabinet, if used only at one or the other.
I suppose you're referring to the use of euro hinges.

This shouldn't happen even with a single stop if butt hinges or, in my case, double-offset knife hinges, are used. It is important, though, that the inset doors are made flat and stable so they look flush at the front with the carcase despite the passage of time.
 
Last edited:
I suspect that the reason overlay doors were originally specified, was that it minimized the amount of precision work required.

I built a couple of cabinets with inset doors.

Of course everything (doors, cabinets and face frames) had to be perfectly square, a skill that I have mastered.

The doors also have to be perfectly flat or that defect is immediately apparent. Almost all of my doors turn out flat. When one does not, I have not a clue what went wrong.

And finally, sizing. The door has to be sized to allow a uniform space around the entire perimeter between the door and the door opening. If the sizing is not precise it will be immediately and visually apparent.

I should also mention that “lipped (perimeter rabbet) doors fell in between the two options above, requiring less precision than inset, but more than overlay. I’m not sure why this construction has fallen into disfavor. I used to see a lot of cabinet doors produced this way. The last time I walked through a kitchen display, I did not see any with this construction. Maybe because Blum-style hinges are not well suited for this???

I make mostly face frame cabinets, as they are more common where I live and I am comfortable with the process. But Euro cabinets are faster and easier to build, especially if I use pre-drilled, melamine clad panels.


Below: An example of a lipped door. Not obvious from the photo is that the hinge edge is lipped too and the hinge is designed to fit the lip. An added complication compared to an overlay door.

NOTE: (I have no idea why this image appears this large.)

1773581430425.jpg
 
The doors also have to be perfectly flat or that defect is immediately apparent. Almost all of my doors turn out flat. When one does not, I have not a clue what went wrong.

I have learned to spend the time making to make a glueing fixture to hold the pieces flat and square.
I will also sometimes put a weight on them while the glue cures.
But I'm gonna have to check my cutter set --- on these doors, the stiles really wanted to roll a bit, with the outside edge wanting to roll towards the back of the door.
 

Attachments

  • Door Glue Up 2.jpg
    Door Glue Up 2.jpg
    1.6 MB · Views: 9
I have learned to spend the time making to make a glueing fixture to hold the pieces flat and square.
I will also sometimes put a weight on them while the glue cures.
But I'm gonna have to check my cutter set --- on these doors, the stiles really wanted to roll a bit, with the outside edge wanting to roll towards the back of the door.
Interesting jig!

It's always a bit of a pain to ensure doors come out dead flat and square. I use panel clamps for mine.
 
I make extensive use of picture framers’ corner clamps, for both cabinet boxes (8 required) and for rails and stiles.

I use the corner clamps while holdin all 4 corners, but only gluing two. After the glue dries, I disassemble, slide in my panel and glue the remaining corners.

I would note that I mostly use mitered corners of late, on shaker doors. There is enough flats on the shaker rails and stiles to allow use of the corner clamps even with the panel in place. I use 2 dowels per corner.

I still measure corner to corner on the cabinet boxes, but I never have to clamp corner to corner to correct for squareness. Even the $2.00 versions seem to be exactly saquare. I probably have a dozen or more. The Bessey and the Pony versions will cost $15.00 each, and are better than they need to be.

1773609481866.jpg
 
Back
Top