onocoffee
Member
I decided to revisit my front vise install for my workbench after attempting it in the fall, failing and walking away from it. Now that the weather may be getting pleasant (despite the snow), I feel able to try again.
The workbench is made of 2x4 lumber with double layer of 3/4" plywood for the top. I originally built it back in 1998 so I don't recall if I glued the top together or if it's just screwed. The worktop has about a 1.5" overhang of the 2x4 frame.
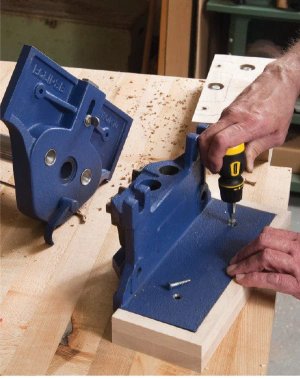
The vise is a 10" cast iron from Woodcraft. I would like the top of the vise to sit flush with the top of the workbench so I can utilize the built-in dog. I also plan on putting wood in the vise for its jaws.
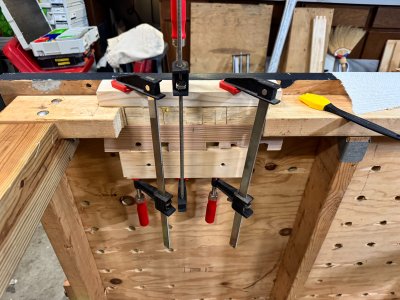
Back in the fall, I started out by cutting a piece out of the frame to let the vise sit flush. I made a support piece to mount behind the frame and another piece to mount in front of the frame to give the vise places to screw into and support. Installation did not go well. The vise is heavy and difficult to lift and hold into position. Then, I realized that the support in the back was insufficient and needs to be extended. Part of the front support broke off and I have reglued it but it in not (at the moment) installed.
I figured I would ask for your thoughts on how I should be approaching this? Part of me thinks I should just unload the entire bench and flip the thing over (it is a Beast) and install the vise upside down? That could even make it easier to cut the rabbets for the MFT/3 rails I'd like to install.
Any thoughts will be appreciated. Thanks!
The workbench is made of 2x4 lumber with double layer of 3/4" plywood for the top. I originally built it back in 1998 so I don't recall if I glued the top together or if it's just screwed. The worktop has about a 1.5" overhang of the 2x4 frame.
The vise is a 10" cast iron from Woodcraft. I would like the top of the vise to sit flush with the top of the workbench so I can utilize the built-in dog. I also plan on putting wood in the vise for its jaws.
Back in the fall, I started out by cutting a piece out of the frame to let the vise sit flush. I made a support piece to mount behind the frame and another piece to mount in front of the frame to give the vise places to screw into and support. Installation did not go well. The vise is heavy and difficult to lift and hold into position. Then, I realized that the support in the back was insufficient and needs to be extended. Part of the front support broke off and I have reglued it but it in not (at the moment) installed.
I figured I would ask for your thoughts on how I should be approaching this? Part of me thinks I should just unload the entire bench and flip the thing over (it is a Beast) and install the vise upside down? That could even make it easier to cut the rabbets for the MFT/3 rails I'd like to install.
Any thoughts will be appreciated. Thanks!