Steveo205 said:Wood bee said:That is clearly a blaitant copy of Steve's design.
+1
You are using an out of date browser. It may not display this or other websites correctly.
You should upgrade or use an alternative browser.
You should upgrade or use an alternative browser.
MFSlab Portable Work Table
- Thread starter SFSteve
- Start date
joiner1970
Member
- Joined
- Jun 13, 2007
- Messages
- 3,163
Is it just a coincidence that the poster has a "bee" in his name and the company selling these rip offs is called "beesleys" ??Steveo205 said:Wood bee said:Hi I found a similar product in tool-shop.co.uk in the uk.
It is a very usefull and easy to transport I have MFT tables but this Festoppa that I got the other day is alot easier to move on and off site. Very clever bit of kit.
That is clearly a blaitant copy of Steve's design.
Maybe I'm just the suspicious type lol
- Joined
- Apr 19, 2015
- Messages
- 29
Hey great design. I have a CNC in the UK, and wanted to know whats the deal if i buy the template and start selling these via a known online auction site? obviously i will not if the original owner says no. I already cut bespoke tables but i do like steves design.
Wood bee
Member
- Joined
- May 13, 2015
- Messages
- 5
socaljohn said:And........ It's his 1st post.
And........ It's a glowing endorsement of the Rip Off Product.
Yes it defiantly looks like Steve’s design. I bought it based on the reviews of Steve’s Slab on the web. I don’t have easy access to CNC and don’t have the time to make myself. I’m a customer of the tool shop and nothing more. However I have found that if you stick Velcro to the underside and to your trestles no slipping.
clark_fork
Member
- Joined
- Apr 7, 2015
- Messages
- 255
Because of shop space allocation, I elected to go with the SF/Steve/Slab solution for my MFT needs. I found a furniture outfit in Missoula Montana with CNC capability and they made it up along with another MFT work surface I am putting together. The slab, under tool shelf and the other piece was a total of $331.00. They supplied the MDF for the work surface and tool shelf. For the top and tool shelf, I think the charge would have been $235.00.
I did not like the plastic stamped out Home Depot/Lowes solution. I elected to build a trestle saw horse based on a Fine Woodworking article by Anissa Kapsales. Note: Although you can modify both height and width, the height dimensions on the drawing are incorrect. I did like the storage feature. The horses take up very little storage space.They also have multiple uses without the top. I am likely to make another set just to help sorting lumber and helping with an assembly project.
The plan is available for paid subscribers of Fine Wood Working. It is from the November/December 2009 edition. http://www.finewoodworking.com/workshop/article/smart-sawhorses.aspx
There is a similar article from American Woodworker. Link: https://books.google.com/books?id=DPYDAAAAMBAJ&pg=PA51&lpg=PA51&dq=trestle+sawhorse+american+woodworker&source=bl&ots=_kZrT3MO7j&sig=g2hcWlWbZGucuRIWej6e9Tkj4Q0&hl=en&sa=X&ei=jF5hVd2SO5TioASUjoOoBw&ved=0CEAQ6AEwCQ#v=onepage&q=trestle%20sawhorse%20american%20woodworker&f=false
There is a second article from Fine Woodworking that features a trestle sawhorse with adjustable height. Link: http://eberhardt.bz/GME_Wood_Land/GME_Woodworking_Stuff/1_Jigs_Tools/14_Ultimate_CC_Sled_011199064.pdf
Lastly WoodSmith has a nice plan of very sturdy alternative: Link: http://www.woodsmithshop.com/download/404/trestlesawhorses.pdf
The challenge of building these Krenov style trestle horses was adapting the plans to using the Domino 500 exclusively. There are three types of cuts. The first is the cut into the base. I went with a 8/4 stock (51 mm) The second cut is typical and is an end cut to the upright and end cut to the cross pieces. The real challenge is the vertical cut along the upright. Since I will likely make more of these horses and at least two friends, signaled they would like a pair, I developed a jig to make all three cuts. The jig allows both the vertical and horizontal cuts by the use of spaces and then the jig can be flipped over and the vertical cuts can be made on the riser. I relied entirely on the Parfitt-Spacer/Registration Process. See Peter’s video on table making. The jig uses both sides of the harness instead of alternating left and right.
I started by making a template of the Domino sole. I then planned the Domino placement and found that a suitable width of 3.5 inches (88.0 mm) I used 10mm Dominos. This allowed two Dominos with ample space between the Dominos but not quite the recommended two widths. (20mm). By using the sole template a 3.5 inch (88.9mm) I was able to calculate two spacers that set the width of a harness that is simply a reverse trim stop allowing the Domino to register on each side. I made the jig two stories. Without the two stacks, I cut the vertical mortises in the base. Then I added the second story, securing the two wings with Qwas Dogs. Qwas Dogs are longer and therefore keep the second layer on the wings of the harness. Finally, I flipped the jig, dropped in a spacer, again securing with a Qwas Dog and cut the vertical risers. The jig works off the center line of each cut. I found that with the Domino, I have to do a lot of center scribing. The upright mortises are made by a plunge cut. Safety note: The Domino 500 on switch is in the direction of the plunge. The plunge cut deserves some practice and caution when turning the Domino 500 on.
Finally, I cut two cross pieces and fit them on the horses. The FOG entries on the Slab MFT suggest there is sag on the slab. I have two lengths of cross pieces, one longer to use when I am breaking down sheets of plywood.
The notches are 1 1 /2 wide the cross arms 1 inch since this piece is only 2 inches wide. The Bridge City Tool Works KM-1 KerfMaker makes short work of these notches. Before cutting, I tuned up the table saw top with a coat of Johnson’s Paste wax, buffed out and added a sprinkle of talc. This eases the drag of the repeat cuts for the notches.
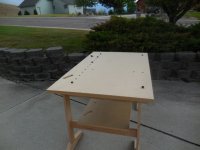
The MDF is one inch. It is too heavy and I recommend finding an alternate top material. With one inch thickness, I had to relieve each dog hole so I could drop clamps in. I took the advice on the plan detail and rounded the edges of the handles.
This will be an all-purpose table so I cut a sheet of ¼ inch MDF, cut handle holes in it and cut some 20 mm holes so I could secure it to the top. Again, I can’t speak more highly of Qwas Dogs. They drop into place with the extra length easily securing the ¼ inch MDF top. I cut some extra holes so I can drop in the bench dogs and use the rail for a quick cut when I have the sacrificial top installed.
All the plans for the Krenov trestle horse suggest the maker create their own foot design. I would probably put thumb nails in the next one. One friend wants a set for a desk so these might have a furniture application. A thumb nail would give a more furniture look.
I thought I would throw in my cut list. The dimensions, take into account the depth and width of both the tool shelf and the top according to Steve’s plans.
I will give the dimensions in feet/inches.
The slab I have is 59 5/16 long and 36 5/8 wide
The tool shelf is 21 ½ by 48
The four feet were cut from 8/4 stock- 2 x 4x 20
The four uprights were 7/8 x 3 ½ x 27
The two lower stretchers were 7/8 x 3 ½ x 28 ¼
The upper stretcher was 7/8 X 3 ½ x 34
The cross bars were ¾ x 2 x 53
The notches were 1 ½ deep except the cross bars are 1 inch
This was another project that called for converting a plan from traditional cut mortise and tenon joinery to Dominos. I am still on the learning curve but I am convinced there is great time savings ahead using Dominos.
[attachimg=2]
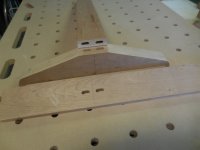
There are three types of mortises for the horses
[attachimg=3]
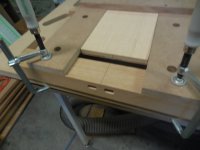
This is the jig with registration on each side of the harness. The second step is to add the spaces and cut the end pieces. The last step is to flip it over and plunge the vertical mortises for the stretchers.
[attachimg=4]
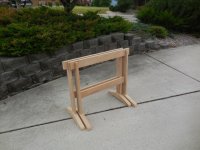
The horses fit together and store nicely
[attachimg=5]
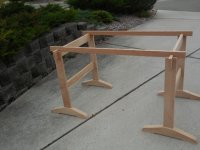
The horses with the cross bars to eliminate sag
[attachimg=6]
With the tool shelf
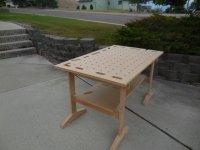
[attachimg=7]
With the top set in place
[attachimg=8]
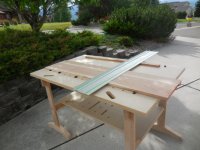
With the 1/2 inch MDF sacrificial top
[attachimg=9]
Set up for quick cut. Sacrificial top is held in place with Qwas dogs
I did not like the plastic stamped out Home Depot/Lowes solution. I elected to build a trestle saw horse based on a Fine Woodworking article by Anissa Kapsales. Note: Although you can modify both height and width, the height dimensions on the drawing are incorrect. I did like the storage feature. The horses take up very little storage space.They also have multiple uses without the top. I am likely to make another set just to help sorting lumber and helping with an assembly project.
The plan is available for paid subscribers of Fine Wood Working. It is from the November/December 2009 edition. http://www.finewoodworking.com/workshop/article/smart-sawhorses.aspx
There is a similar article from American Woodworker. Link: https://books.google.com/books?id=DPYDAAAAMBAJ&pg=PA51&lpg=PA51&dq=trestle+sawhorse+american+woodworker&source=bl&ots=_kZrT3MO7j&sig=g2hcWlWbZGucuRIWej6e9Tkj4Q0&hl=en&sa=X&ei=jF5hVd2SO5TioASUjoOoBw&ved=0CEAQ6AEwCQ#v=onepage&q=trestle%20sawhorse%20american%20woodworker&f=false
There is a second article from Fine Woodworking that features a trestle sawhorse with adjustable height. Link: http://eberhardt.bz/GME_Wood_Land/GME_Woodworking_Stuff/1_Jigs_Tools/14_Ultimate_CC_Sled_011199064.pdf
Lastly WoodSmith has a nice plan of very sturdy alternative: Link: http://www.woodsmithshop.com/download/404/trestlesawhorses.pdf
The challenge of building these Krenov style trestle horses was adapting the plans to using the Domino 500 exclusively. There are three types of cuts. The first is the cut into the base. I went with a 8/4 stock (51 mm) The second cut is typical and is an end cut to the upright and end cut to the cross pieces. The real challenge is the vertical cut along the upright. Since I will likely make more of these horses and at least two friends, signaled they would like a pair, I developed a jig to make all three cuts. The jig allows both the vertical and horizontal cuts by the use of spaces and then the jig can be flipped over and the vertical cuts can be made on the riser. I relied entirely on the Parfitt-Spacer/Registration Process. See Peter’s video on table making. The jig uses both sides of the harness instead of alternating left and right.
I started by making a template of the Domino sole. I then planned the Domino placement and found that a suitable width of 3.5 inches (88.0 mm) I used 10mm Dominos. This allowed two Dominos with ample space between the Dominos but not quite the recommended two widths. (20mm). By using the sole template a 3.5 inch (88.9mm) I was able to calculate two spacers that set the width of a harness that is simply a reverse trim stop allowing the Domino to register on each side. I made the jig two stories. Without the two stacks, I cut the vertical mortises in the base. Then I added the second story, securing the two wings with Qwas Dogs. Qwas Dogs are longer and therefore keep the second layer on the wings of the harness. Finally, I flipped the jig, dropped in a spacer, again securing with a Qwas Dog and cut the vertical risers. The jig works off the center line of each cut. I found that with the Domino, I have to do a lot of center scribing. The upright mortises are made by a plunge cut. Safety note: The Domino 500 on switch is in the direction of the plunge. The plunge cut deserves some practice and caution when turning the Domino 500 on.
Finally, I cut two cross pieces and fit them on the horses. The FOG entries on the Slab MFT suggest there is sag on the slab. I have two lengths of cross pieces, one longer to use when I am breaking down sheets of plywood.
The notches are 1 1 /2 wide the cross arms 1 inch since this piece is only 2 inches wide. The Bridge City Tool Works KM-1 KerfMaker makes short work of these notches. Before cutting, I tuned up the table saw top with a coat of Johnson’s Paste wax, buffed out and added a sprinkle of talc. This eases the drag of the repeat cuts for the notches.
The MDF is one inch. It is too heavy and I recommend finding an alternate top material. With one inch thickness, I had to relieve each dog hole so I could drop clamps in. I took the advice on the plan detail and rounded the edges of the handles.
This will be an all-purpose table so I cut a sheet of ¼ inch MDF, cut handle holes in it and cut some 20 mm holes so I could secure it to the top. Again, I can’t speak more highly of Qwas Dogs. They drop into place with the extra length easily securing the ¼ inch MDF top. I cut some extra holes so I can drop in the bench dogs and use the rail for a quick cut when I have the sacrificial top installed.
All the plans for the Krenov trestle horse suggest the maker create their own foot design. I would probably put thumb nails in the next one. One friend wants a set for a desk so these might have a furniture application. A thumb nail would give a more furniture look.
I thought I would throw in my cut list. The dimensions, take into account the depth and width of both the tool shelf and the top according to Steve’s plans.
I will give the dimensions in feet/inches.
The slab I have is 59 5/16 long and 36 5/8 wide
The tool shelf is 21 ½ by 48
The four feet were cut from 8/4 stock- 2 x 4x 20
The four uprights were 7/8 x 3 ½ x 27
The two lower stretchers were 7/8 x 3 ½ x 28 ¼
The upper stretcher was 7/8 X 3 ½ x 34
The cross bars were ¾ x 2 x 53
The notches were 1 ½ deep except the cross bars are 1 inch
This was another project that called for converting a plan from traditional cut mortise and tenon joinery to Dominos. I am still on the learning curve but I am convinced there is great time savings ahead using Dominos.
[attachimg=2]
There are three types of mortises for the horses
[attachimg=3]
This is the jig with registration on each side of the harness. The second step is to add the spaces and cut the end pieces. The last step is to flip it over and plunge the vertical mortises for the stretchers.
[attachimg=4]
The horses fit together and store nicely
[attachimg=5]
The horses with the cross bars to eliminate sag
[attachimg=6]
With the tool shelf
[attachimg=7]
With the top set in place
[attachimg=8]
With the 1/2 inch MDF sacrificial top
[attachimg=9]
Set up for quick cut. Sacrificial top is held in place with Qwas dogs
Attachments


pingvinlakrits
Member
- Joined
- Oct 2, 2007
- Messages
- 1,093
Clark;
I sure could use a set up like that - that looks great! I will probably go ahead and make a similar solution for on site use, probably a lot simpler but I will surely take a long hard look at these pictures when I get the time to make a PWT.
Ironically I am in the middle of a major renovation where those would be handy but it will have to wait until I actually have spare time in the shop to make them...
Similar threads
- Replies
- 5
- Views
- 339
- Replies
- 0
- Views
- 552
- Replies
- 30
- Views
- 2K
- Replies
- 35
- Views
- 2K
- Replies
- 1
- Views
- 530