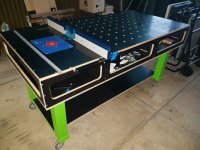
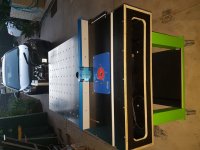
Well it is finally done, just a lazy 6 month project to get it all finalised! I drew inspiration from the new smaller Paulk design and added a few little tweaks to suit my usage better. The bench is still the standard 1800x900mm size, but seeing it is in a workshop and not intended to be mobile, I made it 250mm high so I can get into the voids easier. I've also made a decent support structure using 90x90mm legs and 90x35mm for the aprons and feet, I've also added heavy duty double locking castors on the bottom to aid in moving it around the shop or out under the carport if it is too hot to work in the shop.
The material is all 17mm phenolic concrete form ply so I've got a nice smooth surface when using the router setup and dried glue just peels right off in case I manage to spill any on it. Obviously I couldn't glue the pieces together so there are plenty of 8g 50mm screws holding it tight.
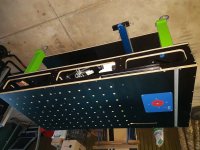
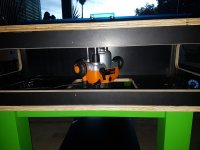
I've made some more deviations to the 'standard' bench by way of dividing the inner section into 3 instead of just 2 sections. the smaller section that houses the router has a solid cross piece so that dust and chips from the router that escape the dust extractor can't get into the other sections under the bench. The remaining space was divided in two and uses a normal style open cross section.
I've grafted the Kreg router fence and plate into the bench and run them across the short side instead of along the long side as these benches usually have them. My mitre gauge has quite a long bar on it so I'd rather have it poke out into open space rather than need to run a 1200(ish)mm mitre slot up the guts of the bench. Also, considering the nominal size of what I cut on the table saw, the router fence can stay installed in this configuration while using the bench as out feed support.
There is a shelf along the base to add extra storage space with oak rails underneath to help prevent sagging and the solid wood parts have had a coat of festool green to get rid of the awful pink primed colour they came in.
The material is all 17mm phenolic concrete form ply so I've got a nice smooth surface when using the router setup and dried glue just peels right off in case I manage to spill any on it. Obviously I couldn't glue the pieces together so there are plenty of 8g 50mm screws holding it tight.
I've made some more deviations to the 'standard' bench by way of dividing the inner section into 3 instead of just 2 sections. the smaller section that houses the router has a solid cross piece so that dust and chips from the router that escape the dust extractor can't get into the other sections under the bench. The remaining space was divided in two and uses a normal style open cross section.
I've grafted the Kreg router fence and plate into the bench and run them across the short side instead of along the long side as these benches usually have them. My mitre gauge has quite a long bar on it so I'd rather have it poke out into open space rather than need to run a 1200(ish)mm mitre slot up the guts of the bench. Also, considering the nominal size of what I cut on the table saw, the router fence can stay installed in this configuration while using the bench as out feed support.
There is a shelf along the base to add extra storage space with oak rails underneath to help prevent sagging and the solid wood parts have had a coat of festool green to get rid of the awful pink primed colour they came in.