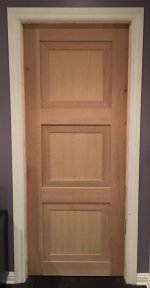
So I'm trying to start the new year off with a bang and finish some projects I've been slowly working on when time allowed. This is the first one I finished. I saw a door I liked on Houzz and basically just made my own version.
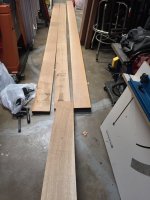
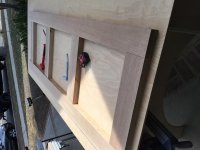
The stiles, rails and panel frames are made of Rift Cut White oak which I bought rough and milled straight and to dimensions myself. The panels are (2) 1/4" Rift white oak veneered on MDF laminated together. (because I had it on-hand and figured I'd rather use it then buy more). The stiles and rails are 2 pieces glued together with opposing grain to hopefully resist any twisting, warping etc. It's an interior door in So-cal so it hardy ever rains, gets humid, or anything else, so I think it will be fine.")
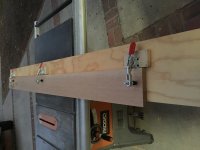
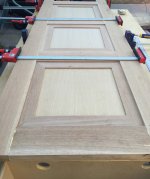
Construction is (2) 14x140 Dominos per joint. I tried a technique I saw in a video of using the 2200 with a slot cutter to route the slots for the panels with the door all clamped up. Like most things you see on-line... It looked easier when someone else was doing it! I unfortunately was so nervous about messing it up that I was death gripping the router and didn't keep it flat and ended up destroying a stile. So I remade that.... Then with it all clamped up I marked start and endpoints on the stiles for each panel and modified the technique by just routing each area one at a time. then stood them on edge and scared the ends of each slot with the OF1010 and an edge guide. That actually went quite quickly and worked perfectly. I wouldn't hesitate to do it that way again, or just do traditional dado the whole stile and make tenons on the rails in addition to Dominos. It was nice not worrying about cutting tenons though.
I used a Woodhaven jig and the OF1010 for the hinge mortises on both the door and jamb and it worked awesome! I just used a story stick on the door, took it to the jamb, put a spacer on top, marked the jam, clamped the jib and routed away. Absolutely perfect mortises on the door and jamb.
I used my tracksaw to trim the bottom of the door and the latch side and put a 2 degree bevel on it.
I plan on doing a Ceruse (or limed) finish, so we still need to decide on a dye color. We are trying to find a door handle to match the other originals in the house (from the 40's) so I haven't drilled and mortised for that yet.
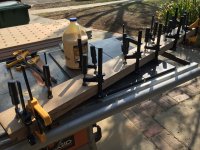
I plan on adding onto the garage for more shop space, but as it is now I basically setup a workshop in the driveway or backyard to work. So I feel like I'm always doing millwork on a jobsite and not in the shop. However that face has also made me put together some nice mobile solutions. So when I do work away from home... I still feel like I'm at home!
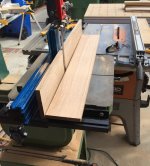
I'll throw in a bonus pic of my custom MFT3 based table I built. I can't take credit for the idea as I combined a lot of other people's ideas/workstations that I've seen on here and made my own. I do like with the 80/20 I can just keep adding sections and improvements to make it do whatever I need!
The stiles, rails and panel frames are made of Rift Cut White oak which I bought rough and milled straight and to dimensions myself. The panels are (2) 1/4" Rift white oak veneered on MDF laminated together. (because I had it on-hand and figured I'd rather use it then buy more). The stiles and rails are 2 pieces glued together with opposing grain to hopefully resist any twisting, warping etc. It's an interior door in So-cal so it hardy ever rains, gets humid, or anything else, so I think it will be fine.
Construction is (2) 14x140 Dominos per joint. I tried a technique I saw in a video of using the 2200 with a slot cutter to route the slots for the panels with the door all clamped up. Like most things you see on-line... It looked easier when someone else was doing it! I unfortunately was so nervous about messing it up that I was death gripping the router and didn't keep it flat and ended up destroying a stile. So I remade that.... Then with it all clamped up I marked start and endpoints on the stiles for each panel and modified the technique by just routing each area one at a time. then stood them on edge and scared the ends of each slot with the OF1010 and an edge guide. That actually went quite quickly and worked perfectly. I wouldn't hesitate to do it that way again, or just do traditional dado the whole stile and make tenons on the rails in addition to Dominos. It was nice not worrying about cutting tenons though.
I used a Woodhaven jig and the OF1010 for the hinge mortises on both the door and jamb and it worked awesome! I just used a story stick on the door, took it to the jamb, put a spacer on top, marked the jam, clamped the jib and routed away. Absolutely perfect mortises on the door and jamb.
I used my tracksaw to trim the bottom of the door and the latch side and put a 2 degree bevel on it.
I plan on doing a Ceruse (or limed) finish, so we still need to decide on a dye color. We are trying to find a door handle to match the other originals in the house (from the 40's) so I haven't drilled and mortised for that yet.
I plan on adding onto the garage for more shop space, but as it is now I basically setup a workshop in the driveway or backyard to work. So I feel like I'm always doing millwork on a jobsite and not in the shop. However that face has also made me put together some nice mobile solutions. So when I do work away from home... I still feel like I'm at home!
I'll throw in a bonus pic of my custom MFT3 based table I built. I can't take credit for the idea as I combined a lot of other people's ideas/workstations that I've seen on here and made my own. I do like with the 80/20 I can just keep adding sections and improvements to make it do whatever I need!
Attachments
-
 IMG_1334.JPG1.5 MB · Views: 901
 -
 IMG_1335.JPG2.4 MB · Views: 835
 -
 IMG_1340.JPG2.4 MB · Views: 824
 -
 IMG_1341.JPG1.7 MB · Views: 925
 -
 IMG_1417.JPG2.2 MB · Views: 756
 -
 IMG_1418.JPG766.7 KB · Views: 870
 -
 IMG_1676.JPG1.9 MB · Views: 920
 -
 IMG_1734.JPG914.7 KB · Views: 1,389
 -
 IMG_1614.JPG1.9 MB · Views: 1,520