Recessed LED Light Discussion

Packard said:
Cheese said:
Packard said:
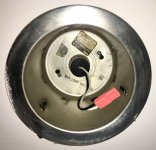
As promised here are photos of my Halo retrofit.  It is ready to be pressed into place.  Installation is a picture of simplicity.  And it works fine.  The problem is that the bezel of the Halo unit will stack on top of the bezel of the original installation.

And here it is installed, bezels stacked, pressed into final position.  To avoid that stacked bezel appearance, I would have to use a right angle grinder inside the cylinder and make a cut around the entire perimeter. This would have to be done overhead, so goggles and a cap would be needed, and it would likely take 5 plus minutes per light to do. 

Even from a distance it makes for an unfortunate look.  I know that there are stamped steel versions out there.  The stamping would probably completely cover the old bezel.

I’m disappointed in the look.  The function is fine.  At some point I will get the energy and initiative to fix this problem.

Can you pull the original can down at all?  Even if you can only pull it down 1/2", you could slip a .040" cut-off wheel between the existing flange and the ceiling and use the flange as a cutting guide/rest. That would certainly ease the task and minimize the modification time.

Thinking about it further, those "flanges" must be removable or the can must be removable from the ceiling side, otherwise, how would they be installed originally?

I don’t recall what the obstacle was, but the old bezel cannot be removed from the can.  I will look again later. 

I can pull it down about 1” and working from the outside sounds easier.  But if I can find a stamped version that covers the old bezel, I would probably just replace these. 

I will take another look when I get home.  But if you are thinking of doing the same thing as I did, look at the old bezel.  The way I have it now, it looks sloppy and every time I walk in the room I see it. 

At any rate, before buying these look at the old bezel and how you will deal with it. If you are like me, you will be disappointed with the stacked bezel look.

Here’s why the bezel has to be cut off and cannot be simply removed. There are 3 screws inside the can (only 2 are visible in the image).  They fit into oblong holes in the sides of the can.  If I loosen the screws I can lower the entire can.  At that point I might be able to make the cut from the outside of the can which should be marginally easier than making the cut from the interior.

wUgUru5.jpeg


i also see that I was mistaken on the manufacturer of the replacements.  These are Philips products.  And they are adjustable for color temperature with a switch on the bottom of the light, which is visible in the image below.

It is difficult to see in this image, but the color adjusting switch ranges from 2700K to 6000K.  With 2700K being roughly equivalent to the old incandescent light bulb range and is a distinctly warm color, and 6000K being roughly equivalent to open shade daylight range which would be a distinctly cool color.

It is unclear to me if the dimmer switch alters the color temperature (it did with incandescent bulbs.

It is also unclear to me if dimming LED bulbs means that less electricity is consumed. Dimming old incandescent bulbs meant that less electricity was being used. 

Ncmb1iy.jpeg
 
[member=74278]Packard[/member] do those LEDs work with the dimmers from your incandescent lights?

RMW
 
Richard/RMW said:
[member=74278]Packard[/member] do those LEDs work with the dimmers from your incandescent lights?

RMW

I had dimmers on my incandescent lights and they appear to work fine with the LEDs.  The modern dimmers that are designed for LEDs have an adjustment switch that allows you to tune the dimmer to the LEDs for minimum light levels.  The early LEDs only allowed you to dim them about 40% to 50%.  These new LEDs have a larger range of adjustments.
 
[member=74278]Packard[/member]  Since the trim ring is bigger than the hole in the ceiling it must be possible to pull the whole thing out.

First try completely unscrewing those three screws in the side. That might allow the trim sleeve to come out, which might be good enough in your case.

If that doesn’t work remove the new Phillips connector and unscrew the Bakelite ring that secures the Edison base socket to the top of the can. Then loosen the two screws that secure the can to the electrical box and counter-clock the can a few degrees and the whole can should come down leaving the Edison base dangling by it’s wires.

There may be three slots in the drywall that need to be aligned with the hardware in the side of the can.


Attachments

  • IMG_0425.jpeg
    IMG_0425.jpeg
    345.8 KB · Views: 33
  • IMG_0425.jpeg
    IMG_0425.jpeg
    345.8 KB · Views: 39
Packard said:
It is unclear to me if the dimmer switch alters the color temperature (it did with incandescent bulbs.

It does not, at least not for those lights.  Any manually-selectable temperature control like that has no other way to control the temperature (unless it has a secondary setting for such).

There are only some manufacturers or settings that provide such a feature, and it will be called out on the packaging.  At least one major manufacturer has likely stopped making them 18 months ago, leaving most of the rest available as "smart" bulbs like Hue.

Link to another video that has plenty of superfluous content but I enjoyed anyway:


Packard said:
It is also unclear to me if dimming LED bulbs means that less electricity is consumed. Dimming old incandescent bulbs meant that less electricity was being used. 

Potentially, but it depends on the driver chips.  Not all dimmers save electricity, either; some convert a portion of the unused power into heat.  Dimming old incandescents also used to make them last longer, but that's not always the case for LEDs, again depending on the driver circuit boards.
 
Back
Top