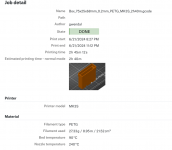
The bottom is custom - 3d printed - indeed, but the top is not: it is the regular systainer lid foam insert part #81200230.Coen said:Yes, with custom inlay top and bottom.
You are using an out of date browser. It may not display this or other websites correctly.
You should upgrade or use an alternative browser.
You should upgrade or use an alternative browser.
Show your systainer
- Thread starter Tooms
- Start date
six-point socket II
Member
- Joined
- Jun 26, 2016
- Messages
- 2,247
What I’m interested in, because of honest curiosity, how does printing those mats/liners and bins relate to time & money spent on consumables and initial investment for the printer vs. buying a couple of the needed clear lid SYS3 organizers/ Systainers?
My guess is, large items like the mats are not printed on small/cheap printers and take a significant amount of time and “waste” to get right?
Does this make economical sense?
Kind regards,
Oliver
My guess is, large items like the mats are not printed on small/cheap printers and take a significant amount of time and “waste” to get right?
Does this make economical sense?
Kind regards,
Oliver
Let's take a simple example of 50x50 SYS3 ORG box: from Festool, 10 pieces cost 18$, ~$2 each including tax and shipping.six-point socket II said:Does this make economical sense?
A similar 3d print (25x75mm) box - same amount of walls, smaller base - is printed in ~3h and needs 27.33g of filament. That exact same part can be bought from a 3d print shop for ~$3. Assuming
- 100W power usage, at 0.37c/KWh,
- using $33/Kg filament,
- Ignoring 3D printer depreciation and maintenance cost since we can assume the printer has been acquired for other projects,
- Ignoring the design, calibration, setup and cleanup time because it is a hobby,
Code:
3*0.37/10 + 33*27.33/1000 = 0.111 + 0.9009 = 1.0119Looking at the base from the picture, the part is printed in at least 2 pieces, which is customary, so it can be generated on a small printer.six-point socket II said:My guess is, large items like the mats are not printed on small/cheap printers and take a significant amount of time and “waste” to get right?
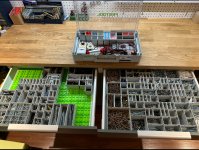
A lot of systainer related parts have been designed in the last 2 years, so we now have all the initial blocks to assemble a solution that fit one's need with minimal waste.
Similar to woodworking, if the part is already mass-produced, it is most likely not economical to 3d print it in a garage. However, by having the exact boxes of different size or height we need, we can store more into each SYS3 ORG, requiring less systainers boxes and space. Reusing empty systainers is also a net gain.six-point socket II said:[...]how does printing those mats/liners and bins relate to time & money spent on consumables and initial investment for the printer vs. buying a couple of the needed clear lid SYS3 organizers/ Systainers?
Gwendal.
Attachments
Hawkeye0001
Member
six-point socket II said:What I’m interested in, because of honest curiosity, how does printing those mats/liners and bins relate to time & money spent on consumables and initial investment for the printer vs. buying a couple of the needed clear lid SYS3 organizers/ Systainers?
My guess is, large items like the mats are not printed on small/cheap printers and take a significant amount of time and “waste” to get right?
Does this make economical sense?
I got into 3D printing last year and I wouldn't wanna be without it anymore, you suddenly see solutions everywhere instead of problems. I was worried about the expense but the power consumption is surprisingly little. The worst bit is the heating process which draws basically full power (some 250-300W for 3-5 minutes), after that you're in the range of running an old incandescent 40-60W lightbulb (material depending). You can even lower those figures by using an encased printer or building an enclosure (which is a hard requirement for some materials anyway).
The amount of filament used is also very little as most walls don't have to be solid (2 wall layers, the rest can often be done with 20% infill). For small items like e.g. smallish Sys Org insert boxes were talking 8-9 grams. I recently printed a plug it conversion for my Makita biscuit jointer which is basically a replacement of the entire rear body and it came out at some 120g material and 14hrs @ 60W, i.e. approximately 3€ for PETG filament and roughly 0.30€ electricity. Apart from the fact that such a part would never be available from the manufacturer it is dirt cheap compared to what Makita would charge for it.
As far as printers go: your run-of-the-mill Ender 3 S1 Pro can be had for under 170€ on sale these days, that's negligible when compared to what we spend on the 'black and green' around here [big grin]
The beauty of it is that you can casually build helpers / tools / jigs / tool improvements / 'general things' (many of which are non-existant on the free market) on a whim on a Saturday night ready to use on Monday morning. I was hesitant at first but I would hands down recommend it to any woodworker nowadays.
You don't even have to do a deep dive into CAD software, you'll be amazed just how many useful things have already been designed by people for free if you just search Printables or Thingyverse for the term "Festool".
six-point socket II
Member
- Joined
- Jun 26, 2016
- Messages
- 2,247
[member=69258]gwendal[/member] Thank you for the in-depth explanation and taking the extra time to link to all the corresponding parts. Initially I did not think that you could get down to approx. 1$/bin, even given the exclusions. Thats cool!
[member=68534]Hawkeye0001[/member] Thank you for sharing your personal story of 3D printing!
Kind regards,
Oliver
[member=68534]Hawkeye0001[/member] Thank you for sharing your personal story of 3D printing!
Kind regards,
Oliver
The unspoken part is that the 3D printed bins are nowhere near as strong as the injection molded ones that Festool sells. Or as smooth.
Yes but it's missing from carlitoa's pic. Usually people don't have Systainers left over with that lid insert. So it adds to the cost.
gwendal said:The bottom is custom - 3d printed - indeed, but the top is not: it is the regular systainer lid foam insert part #81200230.Coen said:Yes, with custom inlay top and bottom.
Yes but it's missing from carlitoa's pic. Usually people don't have Systainers left over with that lid insert. So it adds to the cost.
pascalpetti
Member
- Joined
- Jun 12, 2024
- Messages
- 2
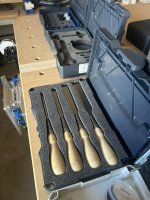
Finally got around to measuring out my stanley's and laser cutting a foam insert for 'em. Also made an insert for bench dogs + dash board setup blocks.
Re: Discussion around 3D printing above: give me a shout if anyone needs something basic modeled that would help them in the shop. Functional tool accessories are super fun to work on and print. I have a few dozen in my shop I use every time I look to build something new.
Re: Discussion around 3D printing above: give me a shout if anyone needs something basic modeled that would help them in the shop. Functional tool accessories are super fun to work on and print. I have a few dozen in my shop I use every time I look to build something new.
Attachments
kevin clifford
Member
- Joined
- Dec 14, 2014
- Messages
- 190
View attachment 1View attachment 2View attachment 3View attachment 4View attachment 5View attachment 6View attachment 7
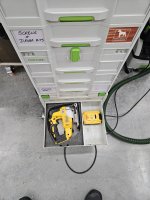
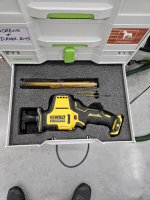
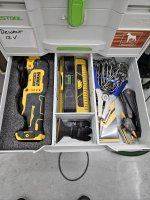
This is the sysroll setup I take for most installs. Keeps everything pretty handy. DeWalt cordless 12v stuff has been working well for me for years in the shop and I added the drill with multiple heads a year or so ago. One jigsaw is dedicated for coping. The tiny sawzall is not used that much but every now and then I am glad to have it. The level not fitting into the tote handle is unfortunate, really would be perfect in there.
This is the sysroll setup I take for most installs. Keeps everything pretty handy. DeWalt cordless 12v stuff has been working well for me for years in the shop and I added the drill with multiple heads a year or so ago. One jigsaw is dedicated for coping. The tiny sawzall is not used that much but every now and then I am glad to have it. The level not fitting into the tote handle is unfortunate, really would be perfect in there.
Attachments
-
 IMG_20241119_102454.jpg317.6 KB · Views: 215
 -
 IMG_20241119_102447.jpg415 KB · Views: 220
 -
 IMG_20241119_102453.jpg342.8 KB · Views: 226
 -
 IMG_20241119_102445.jpg311.7 KB · Views: 226
 -
 IMG_20241119_102457.jpg296.6 KB · Views: 205
 -
 IMG_20241119_102451.jpg375.1 KB · Views: 231
 -
 IMG_20241119_102449.jpg307.4 KB · Views: 296
That's a really neat set up. You get a lot of tools into a compact space, with accessories/bits/blades all accessible.
I've adopted the Dewalt cordless range for my hand tools (18V as I also use the batteries in garden tools). They are pretty good and somehow I don't mind it too much if they get a bit bashed during use. Festool for the corded expensive tools that I treat with more care!
I've adopted the Dewalt cordless range for my hand tools (18V as I also use the batteries in garden tools). They are pretty good and somehow I don't mind it too much if they get a bit bashed during use. Festool for the corded expensive tools that I treat with more care!
HighlandMarine
Member
- Joined
- Apr 21, 2023
- Messages
- 95
Triplepin said:Finally got around to measuring out my stanley's and laser cutting a foam insert for 'em. Also made an insert for bench dogs + dash board setup blocks.
Re: Discussion around 3D printing above: give me a shout if anyone needs something basic modeled that would help them in the shop. Functional tool accessories are super fun to work on and print. I have a few dozen in my shop I use every time I look to build something new.
The Shaper tape and accessory holder looks awesome, and it looks like you may be dialed in for printing a Dashboard PWS mount for said accessories!
Tom the Remodeler
Member
I recently made good use of the Systainer USA sale and ordered a bunch of new Systainers, as well as new colored catches for existing Organizers to easily distinguish between different use cases.
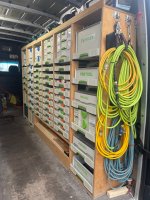
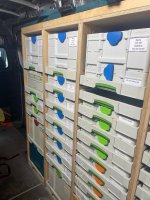
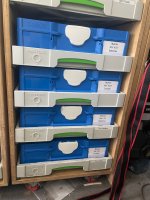
This afternoon I updated the passenger side of my work van. I'm due for a full gut/rebuild soon, but in the mean time this should hold me over until I find time to breath.
[attachimg=1]
At present, I have my Systainers arranged as follows:
-- Festool tools and accessories in their original Systainers
-- Many other miscellaneous items in Festool Systainers
-- Other brands in their original Systainers (Mafell, Mirka, Makita, etc...)
-- Makita tools in Light Grey Systainers with Sky Blue handles and catches
-- Makita chargers and batteries in Sky Blue Systainers with White handles and catches (for fast/easy identification in a stack)
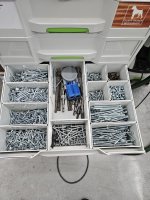
-- Orange catches for fasteners
-- Anthracite catches for hand tools
-- Signal Blue catches for miscellaneous power tools
[attachimg=2]
[attachimg=3]
This afternoon I updated the passenger side of my work van. I'm due for a full gut/rebuild soon, but in the mean time this should hold me over until I find time to breath.
[attachimg=1]
At present, I have my Systainers arranged as follows:
-- Festool tools and accessories in their original Systainers
-- Many other miscellaneous items in Festool Systainers
-- Other brands in their original Systainers (Mafell, Mirka, Makita, etc...)
-- Makita tools in Light Grey Systainers with Sky Blue handles and catches
-- Makita chargers and batteries in Sky Blue Systainers with White handles and catches (for fast/easy identification in a stack)
-- Orange catches for fasteners
-- Anthracite catches for hand tools
-- Signal Blue catches for miscellaneous power tools
[attachimg=2]
[attachimg=3]
Attachments
luvmytoolz
Member
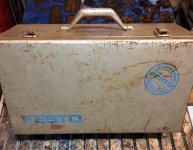
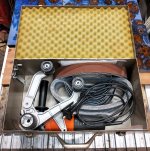
While not a Systainer I thought the original cases might be of interest, and I thought this the most suitable thread.
As some here may know, I started buying Festool (Festo) gear around 45 years ago and back then they came in metal cases with injection molded plastic inserts. Very surprisingly the foam liner hasn't disintegrated.
This one was bought around 1983 from memory, and was supplied with either the very first Rotex, the RS2E, or the OF900 router from memory. I now use it to store my pipe sander. Another one houses some of my grinders, and not sure where the 3rd one ended up.
[attachimg=1][attachimg=2]
Attachments
Cheese
Member
luvmytoolz said:I now use it to store my pipe sander. Another one houses some of my grinders, and not sure where the 3rd one ended up.
Is that a Fein RS 12?
luvmytoolz
Member
Sorry, somehow missed your question Cheese, no it's just an el cheapo from Ebay, I think I paid around $125AUD including a bunch of belts. Bit agricultural but does the job well. The main reason I got it was to de-bark tea tree branches I make into stuff for my missus's kinder.Is that a Fein RS 12?
mcfal12
Member
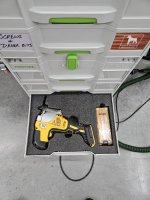
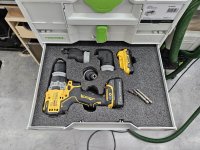
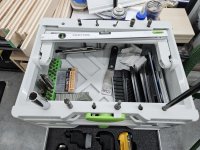
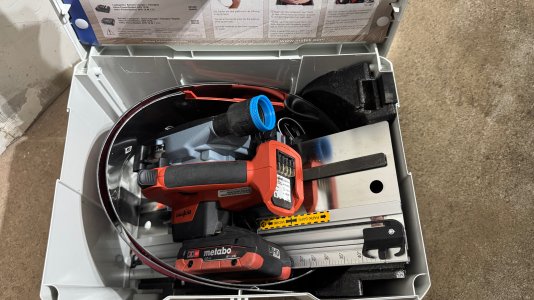
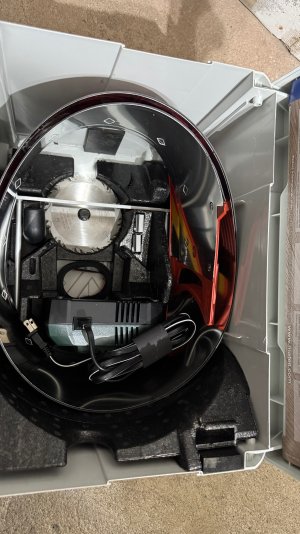
I had some time today in between two quick jobs to do some organizing before I head back out for 6 to 8 week project next week. I posted how the Bosch 12v planer is one of my favorite tools- but without a doubt, my favorite tool is the Mafell KSS 40.
I did buy a smaller form factor Metabo battery to pair with it. love the CAS system and interoperability between the tool platforms and batteries.
I did buy a smaller form factor Metabo battery to pair with it. love the CAS system and interoperability between the tool platforms and batteries.
Attachments
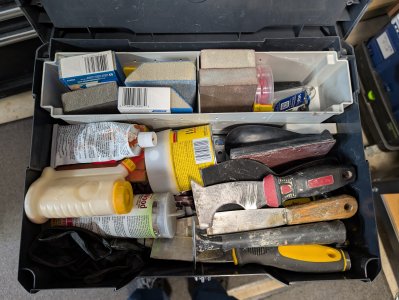
Lots of good stuff in there. I have a Sys Toolbox that has similar contents. Nice to have much of what is needed for the finishing touches in one place.My highly organized catch-all Systainer. It only comes out when a job is almost over.
Cheese
Member
Thanks for getting back...Sorry, somehow missed your question Cheese, no it's just an el cheapo from Ebay, I think I paid around $125AUD including a bunch of belts. Bit agricultural but does the job well. The main reason I got it was to de-bark tea tree branches I make into stuff for my missus's kinder.
") ...Ya I was just curious because that Fein is expensive and unless polishing pipe is what you do for a living, it's probably outside most folks budget.
...Ya I was just curious because that Fein is expensive and unless polishing pipe is what you do for a living, it's probably outside most folks budget.Michael Kellough
Member
Ditto for both tools, but the KSS 40 is the best.I had some time today in between two quick jobs to do some organizing before I head back out for 6 to 8 week project next week. I posted how the Bosch 12v planer is one of my favorite tools- but without a doubt, my favorite tool is the Mafell KSS 40.
I did buy a smaller form factor Metabo battery to pair with it. love the CAS system and interoperability between the tool platforms and batteries.
Lamello missed their chance to equal the KSS 40 while designing the cordless Zeta when they failed to orient the battery so that the tool could stand up right.