Split Top Roubo Bench Build

Tyler Ernsberger said:
Not sure if you have a tooth plane iron but they work great for rough work.  I made a bench a couple years ago out of black locust and it was the only way to plane that kind of wood.  Locust  has very interlocking grain and goes in every direction.  I think you said you bought a ln low angle jack,  i know that they make a tooth plane for it and it works great.  Thats what I used on my bench.

Tyler,

I don't have the proper qualifications to use that blade!
 
The Major stopped by and we planed the slab to spec (102mm)
Although there are some worts, I am pleased.

[attachimg=1]
 

Attachments

  • Slab_Fin.jpg
    Slab_Fin.jpg
    353.5 KB · Views: 2,165
I was a under the weather yesterday so not much was accomplished.  I’m taking it slow.

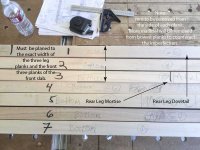
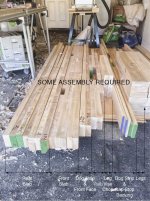
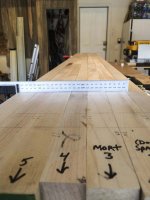
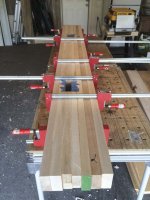
I have a lot of material to dimension.  All the rough ripping and cross cutting is done.  Now it all goes through the planer.  Not much fun but I have to stay on my game or the leg joint won’t work.  (See width dimensioning photo below.)

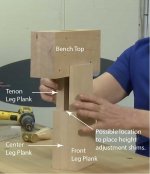
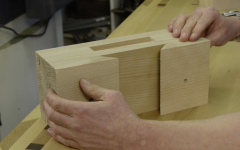
Thanks again [member=2952]Gene Davis[/member] for posting the David Barron video.  I think it’s going to be a great leg joint.  The legs will now be a massive 135mm square.  I’ve illustrated a screen capture from the video that might show another advantage of this joint.  That being, I think the height of a leg(s) can be adjusted by placing a shim between the center leg plank and the bottom of the slab.  Thus eliminating any rocking.  After the height is adjusted the tenon wedges and dove piece will be flushed to the top.

I have another idea I want to run by Ya’LL. 
What about….  Making a 3/4”d x 4”w x ~4’ on the back rear of the bench and flush in a long strip of granite to use a reference (flat) surface?  I have some 3mm dense sheet for under the granite that should eliminate vibration.  Any comments will be appreciated.

[attachimg=1]

[attachimg=2]

[attachimg=3]
 

Attachments

  • BarronJoint.jpg
    BarronJoint.jpg
    34 KB · Views: 2,124
  • Slab_Planks.jpg
    Slab_Planks.jpg
    75.3 KB · Views: 2,181
  • Bench_Components.jpg
    Bench_Components.jpg
    133.6 KB · Views: 2,184
One of my favorite things!
Turbo Suction Brush - 450644
Probably 1/25th the weight of any upright.  A dream to use.

In action on my 12 year old HD garage carpet.


Luke, You seem to be doing a really great job from the start of your project.  !/16" across the diagonals of the top is pretty darned close. My first impression on your question about the 4' piece of granite imbedded in the top surface was "No way".  I is a woodworking bench and woodcutting tools will probably come in contact somewhere along the way.  The granite will be along the back, but still the problem will always be that guy Murphy who always seems to lay down horrible laws that we a all follow.  Even good chisels today are getting to be astronomical in price.  A top quality back saw or a saw blade for your TS 55 re expensive.  Those toys don't fare too well when going against rock of any kind.  If it were me working over a piece of stone, having had years of experience in attacking stone of all kinds with chisels and even my old milwaukee circular saw, I would probably find a way, with Murphy's assistance, to damage one of my best cutting tools on that granite.  You can see scars on my TS guide rail, and a few reference cuts on my fences from my TS 55.  Four teeth missing from my SCMS 60 tooth blade. all because Murphy distracted me here and there.  That is me and my relationship with that guy.

And then, i realized who was asking the question.  With all the work you are putting into that bench, and your desire and struggles to make it perfect, well beyond prfic, our friend Mr. Murphy would never dare to venture into your shop.  I think, in your case, that piece of granite is a great idea.  8)
Tinker
 
Re the granite....It's on the back edge, your bench is pushed against the wall.....so what is it for?  I must be missing something.
 
Tinker said:
It is a woodworking bench and woodcutting tools will probably come in contact somewhere along the way. 
Wayne, good catch!  In thinking about the granite thing I was only concerned with cracking the stone.  It never occurred to me that inadvertent contact with it could damage a tool.

Tinker said:
And then, i realized who was asking the question.  With all the work you are putting into that bench, and your desire and struggles to make it perfect, well beyond prfic, our friend Mr. Murphy would never dare to venture into your shop.  I think, in your case, that piece of granite is a great idea.  8)
Tinker
My only comment is "Yah, right"  You have no idea.

Jim Kirkpatrick said:
Re the granite....It's on the back edge, your bench is pushed against the wall.....so what is it for?  I must be missing something.
Hi Jim,
The piece of granite would be used to check if a piece of stock is flat.  You either stop planing or keep going to remove a cup or bow.
 
I would skip it.  For the reason you may inadvertently run into it with an iron or chisel.  In the end, keep a good combo square or straight edge nearby.
 
I like the granite idea as a point of reference.

Don't worry about Mr. Murphy he's an optimist and we're professionals.
(snickers)

I say go for it, good idea.

8)
 
waho6o9 said:
I like the granite idea as a point of reference.

Don't worry about Mr. Murphy he's an optimist and we're professionals.
(snickers)

I say go for it, good idea.

8)

I can  over engineer damn near anything
 
I could make the stone sit proud of the table surface and removable. Just thinking but the idea does have some merit. The easiest thing would be to just put it on top and forget recessing it altogether.
 
Marc didn't think much of the granite idea.  It's out.

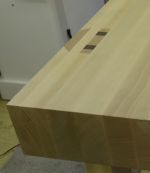
I finished putting the indexing dominos in the back slab. They are referenced off the bottom side.  It came out much better than the front slab did at this stage.

Next is glue-up then level the bottom and plane the top.  The the fun begins after that.

[attachimg=1]
 

Attachments

  • BkSlab-1.jpg
    BkSlab-1.jpg
    81.3 KB · Views: 1,835
Just completed laminating the back slab.....
I am pleased.

[attachimg=1]
 

Attachments

  • SlabBk-1.jpg
    SlabBk-1.jpg
    102.8 KB · Views: 1,874
The fun has officially started.
I realized I made a BIG MISTAKE today.

As you can see in the screen captures from David Barron's Roubo video the front and rear dove tails on the face are built around the leg dove/tenon in three pieces.  Just like the tenon with the wedges in the middle.  Three pieces.

Well.... I did the middle correctly but I forgot about the face plank.  Rather than waiting, I glued it one in one piece.  Didn't wait for the leg.  Now I have to figure out how to mortise it, or forget it.

[attachimg=1]

[attachimg=2]


Attachments

  • Screen Shot 2015-04-21 at 5.42.56 PM.png
    Screen Shot 2015-04-21 at 5.42.56 PM.png
    1.9 MB · Views: 2,128
  • Screen Shot 2015-04-21 at 5.51.24 PM.png
    Screen Shot 2015-04-21 at 5.51.24 PM.png
    200.3 KB · Views: 1,719
Thanks for keeping us updated on your project. I am trying to get myself motivated to do the same, so please stop telling us about the mistakes!  [eek] Just kidding, of course. I learn as much from the mistakes...

Best,
Randy
 
Paul Sellers would rip off the offending lamination, and clean up the cut face with his hand tools to a few thou under the planed surface that got the glue.

And all with his hand tools.

But you have a TS55 and a nice new blade.  If you can plane the top surface to a high degree of flatness you can certainly get that new edge ready for doing the glue-up right.

It'll just cost you some time and one new piece of maple stock for the 3-piece edge. 

Don't cut the corner.  You're gonna have this bench a long time and be admiring your work every time you use it.
 
My wife and I go out to a pizza place nearly every Friday evening.  Every time, about the time we are leaving, a friend of my wife and her male friend come in.  My wife and friend get chatting hill I am talking with somebody else, usually the guy in bak who makes the pizzas.  I am always friends with whoever feeds me, it's the puppy in me.

This past Friday, we were late leaving.  We were outside chatting when my wife's friend, a librarian and her friend came outside.  They were leaving as well.  All of a sudden, i heard the librarian's friend mention something his father used to say.  It perked me right up and i had to get over to talk with him.

He had mentioned that his father had been a carpenter whose favorite saying had been, "Any body can work with perfection.  It takes a good (mechanic) to work with his mistakes."  Come to find out, the librarian's friend is a carpenter.  the two of us got into a conversation, each trying to out do the other (y'all know how those things go) about our own errors in construction and how we were able to work around them.

I think I made a new friend.  Also, at the time, I was thinking of you, Luke.  And some other FOGgers who are not affraid to tell of their own foopahs.  I have mentioned before about my old friend and mentor who used to tell me, "A good mechanic is someone who can cover (work around) any mistake he makes."

This read just gets better and better.  Luke, I am very interested in this project as it has been developing.  I had built a very useful bench back in the '90's that I found in FWW'ing.  I can't think of the name for the bench right now, but it was based around a main beam and pipe clamps.  I had just sort of slapped it together with common 2x4 lumber according to the plans.  It turned out much too big for my present shop set up and i disassembled it.  I kept the pipe clamps and the main supporting beam which i am thinking of shortening and rebuilding the bench on a smaller scale. I don't think I will go to quite the attention to accuracy on that bench as you are with your Roubo, but i think I will be looking back over my shoulder just in case you are watching.  [unsure]
Tinker
 
Tinker said:
  I had built a very useful bench back in the '90's that I found in FWW'ing.  I can't think of the name for the bench right now, but it was based around a main beam and pipe clamps.  I had just sort of slapped it together with common 2x4 lumber according to the plans.  It turned out much too big for my present shop set up and i disassembled it.  I kept the pipe clamps and the main supporting beam which i am thinking of shortening and rebuilding the bench on a smaller scale. I don't think I will go to quite the attention to accuracy on that bench as you are with your Roubo, but i think I will be looking back over my shoulder just in case you are watching.  [unsure]
Tinker
[member=550]Tinker[/member]

Tinker, Are you referring to the "Swiss Army Knife of Workbenches"?  I almost built this too, before I decided to build my Roubo, but it was from 2009 not the 90's.  I'm guessing it's not the same bench.

The New Fangled Workbench; FWW
 
Back
Top