The 144 Workshop 2 - A New shop from scratch

jobsworth said:
Cochese my brotha,

Just checked this thread out, man you did a heck of a job with that shop.  I like using the T-111 panels for the interior walls.I was thinking of doing the same, I have a dumb question, why didnt you paint the panels white? I was going to inorder to brighten the shop up with the white walls being able to reflect the light and brighten it up.

I just found out about those LEDs replacing the Fluorescents. I found out about them on a recent trip to Oregon. I have enough light in my shop already but when I start replacing them Ill be definately going with the LEDs.

Well done mate very nice job [not worthy]

Thanks. I may paint the walls something at some point, but even just the two lights right now are so bright and throw enough light that I haven't felt the need. It might actually border on too much light when I add another pair. That's truly how bright it is in there. That one pic of the hand plane till from October 13 was taken before dawn. It's like turning on the sun when just these two fixtures come on. They are 4100 lumens each.
 
Wow, Now got me going out and spending more $$$$......

My shop is lit up pretty good. But that doesn't mean I cant use more light .
 
Almost everything is moved over at this point. Still some little things to sort out, plus some things still to go structurally like more insulation, a ceiling, stairs, external wall panels and the roof. A little shop tour of what is what so far.

24060018918_b1575d5690_c.jpg

Hose reel installed at a reasonable spot. 50', so it will cover anything on both floors and a good ways outside of the shop too.

24060020278_422a12908b_c.jpg

Temporarily have a drain setup with this hose and a ball valve so I don't have to go upstairs often.

24060023948_ac6f0c57d8_c.jpg

The last bit of wall to be put up is hiding behind my rails. I need to get the long rail, and I have no idea where it will go when I do.

37874271176_204af8ce18_c.jpg


Clockwise around the shop from the entrance. My clamp corner with new rack, fire extinguisher and first aid box, switches for the lights, dust extractor, and air compressor (both upstairs). A Harbor Freight (w/ Powermatic riser) bandsaw and Ridgid drill press serve me well for now.

37874271976_3e93b51a04_c.jpg


MFT that will get a syscart at some point for more storage, my CT Midi, and my streaming TV and Chrome OS computer/monitor.

37874273696_d94a28239a_c.jpg


Holtzapffel-style bench made of fir with some horrible storage underneath. That finish cabinet up above I'm not happy with the location.

37874274636_9fc53c5157_c.jpg


Left side of my miter station. I think this will get a comprehensive redo at some point. Or maybe pieces of it. Ladder for temporary access upstairs.

37874276076_40e70c8ed5_c.jpg


Hitachi C12RSH (sprayer of dust), I wouldn't mind putting a Kapex in here for accuracy and dust at some point. There is a Dewalt 735 below that in a flip cart, and a Triton 3HP in the router table.

37896427252_018a2182f3_c.jpg


Delta 36-725 for the saw, good except for dust collection. Old Craftsman 6-1/4" jointer I found on Craigslist, and my OSS and HCM. Harbor Freight DC and HF compressor upstairs.

 
[member=26457]Cochese[/member] looking good, and just in time for winter. I need to get a streaming video setup out in the shop myself, thanks for reminding me. 2 suggestions FWIW:

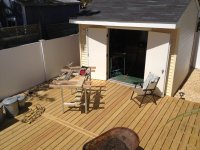
1. Find some way to extend a deck out from the double doors, even if it's only 5-6', @ the same floor height. Takes advantage of the double door & a huge improvement in good weather to be able to roll stuff outside and expand the shop's working area:

[attachimg=1]

2: French cleats french cleats french cleats. Don't like the position of the cabinet, just move it. 'Nuff said.

Hope you enjoy the fruits of your labor.

RMW
 

Attachments

  • 2013-05-27 10.45.32 (Medium).jpg
    2013-05-27 10.45.32 (Medium).jpg
    220.3 KB · Views: 2,199
Wife and I discussed a deck about a month ago. I'm not sure when it will come about, it may have to be after the old shop comes down, depending on how big she wants it. It will be multi-purpose, can be used for cutting down sheet goods or lounging around with a fire pit.

Not too terribly concerned with french cleats at the moment. Used them extensively in the old shop, have pretty much planned everything out here. The finish cabinet is just something that is slightly out of proper proportion to use where I want it, but I may do so anyway.
 
Put the first piece of trim up and a drip cap to control water coming through the top of the door.

37998996091_4254a0ff99_c.jpg

37998997571_763550e670_c.jpg


Ceiling insulation.

37998998961_b1f34a7e84_c.jpg

24247654638_9c87842924_c.jpg


Something important to me in this new shop was having full access to my workbench for the first time since shortly after I built it. I was able to bring this in the shop and set it up without having to move multiple tools unlike before.

24247656688_e6fde0e5dd_c.jpg
 
Time to put the ceiling in. 5mm plywood underlayment (light, and looks really good for being this cheap).

24452519118_e4cafb2ca7_z.jpg


37607342194_3757005d8e_z.jpg


Six of nine panels in, I can now finally put in the ladder.

37607344414_86dd6e059b_z.jpg


Wide, and a heavy weight rating so I can get stuff in and out.

37607346944_35d8cbf56b_z.jpg

37607348424_2b2d09f714_z.jpg


38322975691_9e2f6f1733_z.jpg


Because I had a feeling the outswing would hit either my miter saw wall or the MFT, I chose the MFT and I was right. At least I can move this, and it just means I have a reason to make an MFT syscart now.

38322988881_6c66429d6a_z.jpg


The ceiling is complete except for trim at this point, particularly around the outside where the panels don't have anything to nail into. Bit disappointed that the ladder door doesn't line up exactly with the opening, but I may fit that down the road.

Next up: dust ducts.

 
Decided on sewer PVC vs 30ga duct, and it started to get installed today.

26573636659_170ef75621_z.jpg

45 to 45 jogs around the ceiling joists.

26573638399_a8114f4679_z.jpg

Nothing is permanently installed except the long sweep 90 to the pipe below.

26573640449_7aa2f5e8a8_z.jpg

Testing...

24477551278_83f17c90ca_z.jpg

The miter saw branch. Might also be used for the overarm table saw collection. Some expensive plastic here.

24477553798_23bbd1dfea_z.jpg

Except for some foil tape, the upper part on this side is done so the filter could go back up.
 
Did you do anything to prevent static electricity build-up in the PVC?

This is an interesting thread - I'm following it although I think this is the first comment.
 
This is looking great. Looking forward to seeing your progress.
Speaking of lights, I ordered these a couple weeks ago for my new shop, tried one in my current shop tonsee how bright they really are, and Wow! Thank you Sams club
17ede7a4068dc832d84c08ff61ad06db.jpg


Sent from my iPhone using Tapatalk
 
HarveyWildes said:
Did you do anything to prevent static electricity build-up in the PVC?

This is an interesting thread - I'm following it although I think this is the first comment.

My research on it said it was basically a placebo in a hobbyist-size shop.
 
"Nothing is permanently installed except the long sweep 90 to the pipe below."

A pair of 45s would have less flow restriction and less chance of something getting
caught at the bend.
 
Bob D. said:
"Nothing is permanently installed except the long sweep 90 to the pipe below."

A pair of 45s would have less flow restriction and less chance of something getting
caught at the bend.

The sweep is almost exactly the same as the two 45s I tested. At least with the height I was working with.
 
JBag09 said:
This is looking great. Looking forward to seeing your progress.
Speaking of lights, I ordered these a couple weeks ago for my new shop, tried one in my current shop tonsee how bright they really are, and Wow! Thank you Sams club
17ede7a4068dc832d84c08ff61ad06db.jpg


Sent from my iPhone using Tapatalk

That's good to hear.  I bought those same lights for my garage based shop, but have not installed them yet.
 
RobBob said:
JBag09 said:
This is looking great. Looking forward to seeing your progress.
Speaking of lights, I ordered these a couple weeks ago for my new shop, tried one in my current shop tonsee how bright they really are, and Wow! Thank you Sams club
17ede7a4068dc832d84c08ff61ad06db.jpg


Sent from my iPhone using Tapatalk

That's good to hear.  I bought those same lights for my garage based shop, but have not installed them yet.
I have not installed them either, I took one out of the box, plugged it in and held it up. It made the rest of the garage looked dark almost. I’ll let you know how 18 of these lights do hopefully sooner than later

Sent from my iPhone using Tapatalk
 
This is the first bit of cold since I got the ceiling insulation all taken care of, so I was interested to see what the heat loss was overnight. It got down to about 45F, so not fantastic but not horrible either. Will be very interested to see what happens this winter, particularly after the attic insulation and exterior panels and shingles get on. May buy one of those attic ladder tents too.

26600831389_2e100e2625_z.jpg
38376505271_389ede4445_z.jpg


PVC trick I picked up.
26600843149_b46d1559ee_z.jpg


Decided to change up the main branch a little for better efficiency and to save a few bucks.

38376507411_1d53191892_z.jpg

38376517531_26b983c418_z.jpg

38376520021_fc5cb26d43_z.jpg


This is the tedious part. I'm so close to making sawdust but instead I'm making PVC shards.
 
Insulating the doors, getting the last things in place, and finally upgrading from my cordless trim router.

37740891735_0910342385_z.jpg


37740904465_a34041a086_z.jpg


38596420042_d681fd04ff_z.jpg
 
Back
Top