Using Domino 700 Connectors to Assemble Custom Divided Lite Glass "Panel" Door

TinyShop

Member
Joined
Feb 5, 2017
Messages
661
Hi All - I am considering using the Domino 700 connectors in what might be viewed as a somewhat unconventional application.

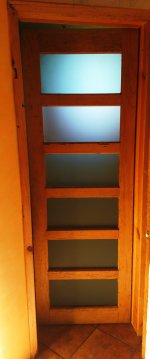
First, to set the scene, a photo:

View attachment 1

Normally, in a single- or divided-lite door (be it a passage door or cabinet door, etc.) when glass panes are installed, it/they are laid into a rabbet (often also into a bed of caulking) and then secured in place around the perimeter with the use of some sort of mechanical retaining strips (or the equivalent). The purpose of this tried and true method of construction, of course, is to enable individual panes to be replaced at a future date should any glass become damaged (without having to break all of the permanent joints and destroy the door in the process). However, this process of replacing a pane of glass is time consuming and, if not undertaken carefully, can result in damage to the door itself or, most often, to the associated retaining strips (which are often considered "consumables" meaning that new ones must be fabricated to replace those that were damaged during removal). Plus, I've never been a fan of how retaining strips are visible on one side of the door (or, for that matter, window). The strips are too "busy" for my eye, particularly when compared to the clean lines of a panel door.

So, here's what I'm thinking. I want to build a sliding-door version (a.k.a "barn door style") of the door shown above for a bathroom. However, I want to construct the door like a regular panel door (using panes of glass in place of wooden panels) and rely on domino 700 connectors on the non-hinge-side stile (one at each rail joint, accompanied by one regular but non-glued wooden domino) to hold the whole thing together.

Employing this "partial knock-down joinery" technique (which I've never before heard of in door construction) would allow me, should I ever need to replace a pane of glass, to simply remove the non-hinge stile (by unfastening each domino connector) and thus expose each pane of glass for simple removal/replacement. It would also, I think, make for a super attractive and "clean" looking door (plus, it would speed up the entire construction process).   

I'm thinking of using reclaimed hemlock (local to me) to minimize the weight of the door and also to add to its beauty, since it will only be receiving a natural clear coat of some kind. And, to prevent the glass panes - which won't be otherwise held in place - from moving/rattling when the door is moved/operated, I plan to fold something (paper or saran wrap?) over the outer most edges of the glass in strategic locations during assembly to lightly wedge the glass in place (while being cognizant of the fact that the wood will swell and contract over time with ambient moisture levels). If I source a metric slot cutter, which can be had in multiples of 1mm widths, I should be able to mill a groove that is only one or two millimeters wider than the thickness of whatever thickness of glass I end up selecting (1/8" or 1/4"). I should then be able to find something that will work to lightly wedge the panes into the grooves. Alternatively, I could maybe use a few drops of silicone caulking spaced appropriately around the perimeter of the glass, just enough to prevent movement but not enough to prevent a pane from being slid out if necessary when the non-hinge-side stile is removed. I'll also have to make sure to size the panes in relation to the volume of free area with the ease of their future removal in mind, leaving plenty of room all the way around for the wood to move without ever binding the glass.

So, a "glass panel domino connector door": is this a bad idea?
 

Attachments

  • Inspiration_compressed.JPG
    Inspiration_compressed.JPG
    3.9 MB · Views: 187
Go for it. If you don't mind connector cover lids, I don't see why not. This is a narrow and light door, mortising and gluing on the hinge side will be enough.
 
Svar said:
Go for it. If you don't mind connector cover lids, I don't see why not.

Yeah, I think the closest-color-matched covers would blend in fine (and I'd make sure they were on the interior face of the door).
 
Oops, I just realized that I blended-in the ideas and terminology of a regular hinged door into my description. I didn't mean to confuse things but my plan is to mount this door not on hinges but on a rail (so it slides open and closed). This more uniform support should eliminate any concerns I had over the strength of the door (were it to be otherwise hung on hinges).
 
As a glazier of 38 years I can sympathize with your hesitation to have removable stops.  There is no real reason your method will not work.  My only suggestion is that instead of inserting paper that you either use the foam balls that cabinet makers use to trap panels or what we do which is to put a small bead of silicone in the corners to absorb movement.  A small amount will still allow replacement.
We replace hundreds of panes and insulated units every year.  Most manufacturers do not design their units to be repaired, it leads us to some very creative methods for replacement, including cutting profiles off with a Supercut and reinstalling after the glass is replaced.
 
I think your plan should work. I recommend you mix in regular Dominos as the connectors have no rotational resistance. The connectors that work with the 500 Domino might work depending on the thickness of your door material.

I have read about tiny rubber balls that are used in applications like yours to cushion the glass. They would be an alternative to the methods you are considering.

Just curious, but how are you going to defeat water getting around the glass and into the wood?
 
rst said:
As a glazier of 38 years I can sympathize with your hesitation to have removable stops.  There is no real reason your method will not work.  My only suggestion is that instead of inserting paper that you either use the foam balls that cabinet makers use to trap panels or what we do which is to put a small bead of silicone in the corners to absorb movement.  A small amount will still allow replacement.
We replace hundreds of panes and insulated units every year.  Most manufacturers do not design their units to be repaired, it leads us to some very creative methods for replacement, including cutting profiles off with a Supercut and reinstalling after the glass is replaced.

Much appreciated advice. Thank you!
 
Birdhunter said:
I think your plan should work. I recommend you mix in regular Dominos as the connectors have no rotational resistance. The connectors that work with the 500 Domino might work depending on the thickness of your door material.

I have read about tiny rubber balls that are used in applications like yours to cushion the glass. They would be an alternative to the methods you are considering. That said, I like the advice given by [member=25351]rst[/member].

Just curious, but how are you going to defeat water getting around the glass and into the wood?

Yes, I've considered "Space Balls" (the tiny round rubber spacers that come in different diameters and that allow for panel movement) - I'll just have to see how they may or may not work with the dimensions of the grooves I end up cutting. That side, I like the advice given by [member=25351]rst[/member] .

Regarding moisture, given that this will be an interior door (albeit for a rather tiny bathroom) I'm going to just rely on diligent application of whatever natural finish I settle on and rapid drying (helped along by an extraction fan) after showers to minimize the ravages of condensation. Or maybe I'll instead build the door out of Northern white cedar...?

And, as for the use of regular wooden dominos in conjunction with the connectors, I detailed my intent to do so in my initial post. But I welcome your suggestion nonetheless! :)
 
Thanks everyone for the support! Now, I just need to figure out which connector components I'll need.  [crying]

In a flush butt joint situation like the one I propose, I'm a little unclear whether per joint I should go with the combination of:

One DOMINO Connector Double Bolt (SV-DB) and two DOMINO Connector Cross Anchors (SV-QA)

View attachment 1

...otherwise known as the following:

DOMINO Connector Surface (FV)

View attachment 2

...(minus, of course, the included "DOMINO Connector Extension Shells" since I'll be working in solid wood)...

[in which case I will need two covers/caps per joint]

or, instead, the combination of:

One DOMINO Connector Expansion Anchor (SV-SA) and one DOMINO Connector Cross Anchor (SV-QA) and one DOMINO Connector Anchor Bolt (SV-AB)

View attachment 3

...otherwise known as the following:

DOMINO Connector Corner (EV)

View attachment 4

[in which case I will only need one cover/cap per joint].

In the first combination, all the strength seems to come from the perpendicularly-placed Cross Anchors (which can't go anywhere) and the associated oblong holes in the connector bolts (which, as a I understand it, work in concert with the grub screws to mimic the action of a double draw bore tenon).

In the second combination, some of the strength relies on the principle of an expanding wedge.

So, I'm not sure which option offers more overall strength/reliability or, for that matter, which combination of components this kind of joint mandates as originally determined by Festool engineers. From what I've been able to read/watch, the first combination seems to be intended for butt joints (specifically, when butting the edges of two panels together) while the second is apparently intended for corner joints.

Thoughts?
 

Attachments

  • 1st_combination.jpg
    1st_combination.jpg
    5.8 KB · Views: 123
  • 1b.JPG
    1b.JPG
    9.7 KB · Views: 567
  • Combination2.jpg
    Combination2.jpg
    9 KB · Views: 118
  • Corner.jpg
    Corner.jpg
    3.6 KB · Views: 560
I missed the part of the post where you mentioned adding the regular Domino tenon. Sorry.

I built a king size bed frame using the corner connectors plus the wood tenon. It’s held up well in spite of the efforts of an active 2 year old boy to loosen the joints. I kind of remember the connectors needing a 14mm mortise. Big hole. Very accurate placement of all the holes is super critical.

 
How wide are your rails?  Be sure that you will have enough space for the width of the connector and the domino, allowing for spacing between them, and a sufficient margin between the fasteners and the grooves for the glass. That margin is specified in the connector instructions.

Could you eliminate the need for the domino by making a tongue on the rail to fit in the stile’s groove for the glass? This could allow you to use a narrower rail, less prone to splitting, and eliminate the twisting issue.

I advise against using the expansion anchor in the rail, as it could easily blow out the side.

I have plenty of both kinds of 700 connectors. I’d be happy to lend you a sample to experiment with. PM if you’re interested.

Cheers,
Crox

 
Crox G said:
How wide are your rails?  Be sure that you will have enough space for the width of the connector and the domino, allowing for spacing between them, and a sufficient margin between the fasteners and the grooves for the glass. That margin is specified in the connector instructions.

Could you eliminate the need for the domino by making a tongue on the rail to fit in the stile’s groove for the glass? This could allow you to use a narrower rail, less prone to splitting, and eliminate the twisting issue.

I advise against using the expansion anchor in the rail, as it could easily blow out the side.

I have plenty of both kinds of 700 connectors. I’d be happy to lend you a sample to experiment with. PM if you’re interested.

Cheers,
Crox

This is still in the conceptual phase so I haven't settled on any dimensions yet. However, I'd wondered if I could eliminate the regular domino at each joint and simply go with a single connector. Your notion of employing a T&G joint (which would serve as the anti-rotation measure) is intriguing and I will definitely consider it. This project - which is part of a much larger one also still in the planning stage - is a couple of months off yet (I like to plan ahead) and I'm away from home until then so I can't take you up on your offer to play with the parts. That said, I'll heed your advice against using the Connector Expansion Anchors and instead plan on using the combination of Double Bolt and Cross Anchors. I was leaning that way myself so its good to have someone with experience reinforce my thinking. Thanks so much! :)
 
TinyShop said:
... glass panes ... for a bathroom ... reclaimed hemlock ... only ... natural clear coat ...
In case the 'bathroom' isn't only a guest toilet but with a bathtub or a shower (especially should you like these kind of refreshments in long with plenty of hot water) you'll have moisture in the form of hot vapor that really likes to travel to wherever it can condensate. That can give you very interesting problems when it finds it's way toward wood below the dew point - problems that might result in the end of your glass panels should the door decide to take a new shape.

I suggest you make sure that you seal the wood completely (which includes each and every slot, mortice and screwhole) and to make sure not to damage the surface when assembling (this includes putting in the dominos/connectors).

to prevent the glass panes - which won't be otherwise held in place - from moving/rattling when the door is moved/operated, I plan to fold something (paper or saran wrap?) over the outer most edges of the glass in strategic locations during assembly to lightly wedge the glass in place (while being cognizant of the fact that the wood will swell and contract over time with ambient moisture levels)
In case you have a T-slot cutter for your router you could use something like these to hold the glass panels in place.

Crox G said:
Could you eliminate the need for the domino by making a tongue on the rail to fit in the stile’s groove for the glass? This could allow you to use a narrower rail, less prone to splitting, and eliminate the twisting issue.
This could be a good idea, would allow for getting away with using fewer connectors (like one each top/bottom and only one or two in the middle) and putting in only one smaller domino (just to prevent vertical movement of the rails as lateral and twist would be impeded by the toungue/groove) into each rail without one, resulting in less visible caps needed to hide the mortices for the connectors.

Or simply screw the rails to the stile and put in wooden plugs (in which you can put a scew to pull them out, should you ever need to disassemble the door to replace a glass).
 
On further thinking, should you glue the rails to the stile on the hinge side and only have the handle side detachable you'll most certainly also get away with using the new, smaller D8 connectors.

These have the upside of the holes on the side there are conveniently round, making it way easier to create a wooden plug for them...
 
Gregor said:
On further thinking, should you glue the rails to the stile on the hinge side and only have the handle side detachable you'll most certainly also get away with using the new, smaller D8 connectors.

These have the upside of the holes on the side there are conveniently round, making it way easier to create a wooden plug for them...

Hmmm, I'll have to price out the various bits and bobs (and associated tooling) that I would need in order to see which of the two connnector options is cheaper for this particular use. My goal is to avoid purchasing a complete systainer'ized set (but more on that in a moment).

[Googling....] Yikes! Regarding the 500 connectors - and setting aside the obvious option of a US$375 complete systainer'ized "Connector Range" - just the tooling for the 500 connectors (IOW the drill/cutter and guide/template - both of which are obligatory equipment when utilizing the related connectors) together retail for US$135. The connectors themselves would be yet more. Since I would opt for the package that contains 25 MSV D8 "Center Panel Connectors" (203167), that's another US$80 retail. All told, I'd be in for US$235 and I'd have ton of spare connectors left over.

Instead, I think I'll stick with the 700 connectors since no additional tooling is necessary and I can purchase a relative small quantity of 16 connectors (closer to the number I'll need) for $80 retail (and, if need be, any leftovers would be easy to sell) and a bag of covers for ~US$10. So, all in, I'll be down less than US$90. I'll spend the savings on the sliding hardware.

And, if I find myself in the future needing additional/different connectors for any other project(s) - I'm not envisioning anything right now - I'll just buy what I require at that time. For what it's worth, I am opposed to the complete sets because, in each case, they include components that are intended for use with melamine/particle board - a material that I avoid at all costs [so why pay for something I'll never use?] - and special length wooden dominos (I do and would make my own), none of which would be easy to unload on the secondary market.

But, all that aside, I really do appreciate your share! I'm sure that others will benefit from your ideas. :)
 
TinyShop said:
... [D8 connectors = expensive] ...
For the D8 connectors you effectively only need the bit for the domino (which you might already have in case you either bought the tenon systainer or worked with 8mm dominos before) and a 15mm drill (with a steady hand or a in a drillpress) should you be fine to skip the convenience of neither having to measure the position of the access hole nor putting effort in controlling the angle/dept of the plunge (nor having a convenient place to attach the DC hose) that the jig offers.

The #203166 KV D8/50 edge connectors (with the spreading anchor, 50 pack) is ~75€ (while the SET systainer goes for ~300€ street price, as a comparison) incl. VAT here in germany (a sane gouvernment here, a good while back, banned manufacturer set pricing - free market and such). You could certainly offload a partly filled pack without much problems or hefty lossed (or just ask your dealer for some samples, in case you only want to do the one door ;)).

For mass production with the D8 connectors certainly the jig with the centrotec drill bit is a must have (as it makes it braindead simple and quick), but for seldomly undertaken private one-off projects containing only a tiny few of them the somewhat reasonable extra effort might be palatable, compared to the cost of the jig/drill.
 
I found it advisable to practice on scrap installing the 700 connectors. I also found it helpful to clearly mark on the boards where the mortises go and to what depth. It’s easy to mess up as the process is complicated.

It is critical to know that the expanding anchor cannot be removed once expanded.
 
[member=53905]Gregor[/member] - I had a feeling someone was going to respond as you did - where there's a will, there's a way! ;D As I was writing, I recalled vaguely something on another thread in which someone discussed a workaround to the need for the cutter/template combo. Toward that end, while I do have the 8mm cutter and a corded 1/2" drill, I don't have a dedicated drill press or (yet) a high quality drill stand. That said, thanks for reaffirming the notion that, of course, the 500 connectors can be installed using an alternate technique. Accordingly, I'll reconsider my plans.

[member=15289]Birdhunter[/member] - Good advice. I've watched a ton of videos detailing the process and you're right, the multiple steps and differentiated machine settings require a cool head. I really like your idea of writing the necessary set-up info directly on the workpiece as a hedge against error making. I'll adopt that immediately! :)
 
Of coarse you could skip all those connectors and simply drive long screws through the stile into rails. They'll survive a dozen disassemblies.
 
Back
Top