Michael already listed the best source for DIY vacuum bagging, Veneer Supplies and their sister site, Joe Woodworker. The latter is great if you're just interested in learning more about the process, tools, techniques, without too much of a hard sell.
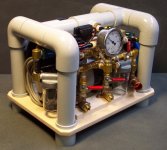
If you're looking to get the right pump size, start by checking out the comparison PDF at Michael's link below. I built my own Project EVS a few years back with a Thomas Dual Piston Pump, which I believe is somewhere in the 4 CFM range and suitable for vacuum bags about as big as 4x9 feet.
If you're looking to get started and won't be veneering all day, I would probably skip the auto-cycling kits and just look for continuous-running pumps. Auto-cycling is OK, but if you have even the tiniest of leaks in your vacuum bag, it will be turning on and off all the time, and not really much energy savings there. Also, keep in mind ~1-2 hours is about the max you want to veneer press most panel projects, as running it too long can cause issues with rippling. Joe mentions, "Pressing a panel with a standard veneer adhesive (such as X-Press™) for more than an hour can cause the veneer to ripple. This happens because moisture in the adhesive over-saturates the veneer and causes the wood cells to expand."
In looking for a pump, you'll want one that can maintain 21" of Hg. "It is well known that 21" of Hg is the ideal amount of vacuum for most veneering jobs. At this level, you get 1,470 lbs per square foot in force. If you're building a 15" x 42" veneered table top, a vacuum press can create the equivalent of 6,431 lbs of total pressure."
The CFM of the pump is what dictates how large of a bag you can use. But if you're only planning to do 4x4' or smaller, you could probably get away with a pump as small as 1.5 CFM.
Don't forget all the other super cool stuff you can do with a vacuum pump. Vacuum clamping is awesome for sanding and finishing panels as well.