Split Top Roubo Bench Build

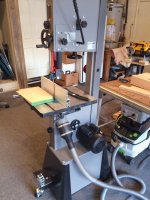
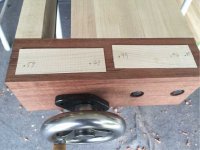
I picked up a Laguna Tools 14/Twelve bandsaw today.
The Major and I moosed it on and off his truck, wrestled it out of the packing materials, bolted the stand together and got all 280lbs upright.  The Major left me to mung with the rest of the setup.

The last time I used a bandsaw was eighth grade shop class.  On either the triangular walnut tie holder of the ball pean hammer.  I can't remember which.  The Laguna directions were a C- until it got to the important part and then they improved.  Namely blade tension, tracking, and guides.

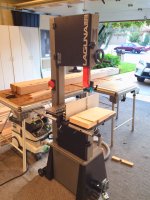
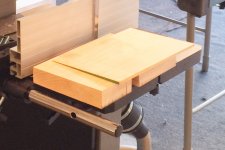
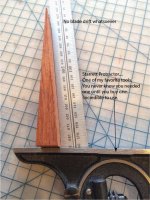
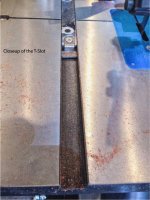
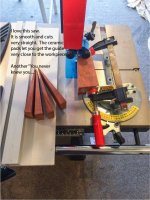
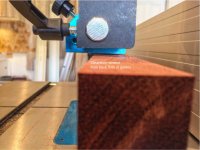
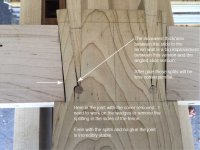
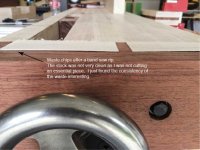
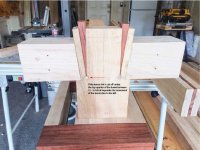
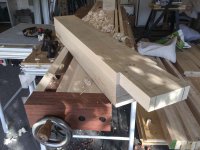
It went pretty well.  The fence is not square to the table (See Photo of Tall Rip) and there appears to be a slight low spot in the back left of the table.  Thats not a problem, the fence is.  It was late when I got to that point.  Tomorrow I'll see if I can figure it out, otherwise I'll call Laguna on Tues.  The saw did seam to track great.  I didn't see any drift.  I only made two cuts with it.  I'll test more tomorrow.

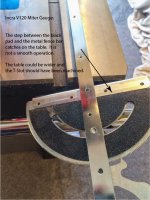
I bought the saw at Rockler.  They have a special where the work light is free.  (Mine is back ordered)  I also had a 15% coupon for anything that isn't a power tool.  This was great for the mobility kit and a 5/8" 3-4 skip Laguna blade, but it was a wash for anything I could buy on Amazon.  Such as Bessey clamps and an Incra V120 miter gauge they were 15% less than Rockler list.  At least I had them right away.

The gentleman at Rockler that knew Festool helped with some fittings to reduce the 4" dust port down to fit the 50mm hose.  It worked great. 

Have a safe Memorial Day,

Luke

[attachimg=1]

[attachimg=2]

[attachimg=3]
 

Attachments

  • BandS1.jpg
    BandS1.jpg
    764.9 KB · Views: 1,427
  • BandS2.jpg
    BandS2.jpg
    808.1 KB · Views: 1,449
  • BandS3.jpg
    BandS3.jpg
    218.2 KB · Views: 1,459
luke I have that same saw and tried the festool dust collection thing like you have going on there you're gonna want to plumb it into a dust system. The festool vacs just won't keep up.
 
zaschaffer said:
luke I have that same saw and tried the festool dust collection thing like you have going on there you're gonna want to plumb it into a dust system. The festool vacs just won't keep up.

Dang.
I did not want to hear that.  I don't have the room.

To my way of thinking, that should apply to re-sawn cuts with a tall vertical.  I think the CT should keep up with flat rips and crosscuts of 8/4 stock.  Those are the same cuts that a TS makes.

Thanks.

BTW:  Would you buy it again?

 
I think the ct would keep up with that thick of material. (I cut a lot of headrests for chairs and they run from 5-8" in width).

I would buy it again. For the price it is a good saw. I am on the waiting list for some Carter bearing glides when they release them (hopefully sooner rather than later). The nylon glides are great once you get them adjusted right, but I do think Carter makes a better product.

I have had the saw for like 6 months and made a bunch of Maloof chairs with it (so far so good).
 
I have not been able to square the fence to the table in "tall mode". It's out about 1mm from top to bottom.  The table is now 90 to the blade.  Here are some of my findings.....

[attachimg=1]

[attachimg=2]

[attachimg=3]

[attachimg=4]
 

Attachments

  • BandSm-4.tif.jpg
    BandSm-4.tif.jpg
    86.4 KB · Views: 1,294
  • BandSm-3.jpg
    BandSm-3.jpg
    86.3 KB · Views: 1,274
  • BandSm-2.jpg
    BandSm-2.jpg
    72.9 KB · Views: 1,306
  • BandSm-1.jpg
    BandSm-1.jpg
    91.3 KB · Views: 1,411
I am sure the directions from mfg are good, but I would check out Carter's youtube vids for setting up a band saw.  I have a 10 year old Grizzly 16", and recently purchased the Carter bearing set, and after watching their videos on how to set up any band saw, mine is like having a new bandsaw.  At the woodworking shows, Snodgrass says that if a band saw is properly set up there should never be any drift.

Thanks for sharing all your experiences.  Refreshing to see other folks have minor glitches in their projects too.  Bill
 
Billedis said:
I am sure the directions from mfg are good, but I would check out Carter's youtube vids for setting up a band saw.  I have a 10 year old Grizzly 16", and recently purchased the Carter bearing set, and after watching their videos on how to set up any band saw, mine is like having a new bandsaw.  At the woodworking shows, Snodgrass says that if a band saw is properly set up there should never be any drift.

Thanks for sharing all your experiences.  Refreshing to see other folks have minor glitches in their projects too.  Bill

Hi Bill.
Hope you (and everyone) are having a great holiday.

I do have a new bandsaw!  I watched the half hour Alex Snodgrass video on setting up a bandsaw the day before I purchased my saw.  I was all ready to set the Laguna up exactly as he demonstrated.

Then I read the manual.  Laguna talked about different methods of positioning the blade on the wheel, setting the tension and guides.  Pros and Cons.  They want the blade positioned dead center on the wheel.  Tip of teeth to back of blade.  I decided to follow their directions first and see what the outcome was; also because I purchased a Laguna Tools 5/8” blade.  It made sense to me to buy a Laguna blade for a Laguna saw.  Also the ceramic guides are totally different than bearings so I stuck to the manual. The Laguna ceramic guide adjustment is exactly like Alex showed on the video, including positioning the back pad to just touch the blade.  The blade will make a shallow groove in the ceramic pad, just like the Carter grooved bearing.  This helps it to track.  If the groove gets too large over time you just rotate the pad a few degrees.

This was the first time I set up a bandsaw.  Unbelievably it has no drift, at least when I use a fence or the miter gauge.  Can’t see why I wouldn’t use them for straight cuts.  The manual talked about the single point guide method of ripping.  They said not to use this method because “You now own a real bandsaw”.

If this changes over time I’ll try some things.  Right now i consider myself lucky.  I ordered a Timber Wolf 1/2” blade before getting the saw.  I’m sending it back and getting a Laguna 1/4” blade for scroll work.

I also watched a Fine Woodworking video on installing a blade.  The biggest take away was the narrator saying never use a blade with more than 3-4 teeth/in.  I though “What?”  He said that fine teeth will always get clogged and this will not only slow cutting but send the blade off track.  It’s like pushing against a dull blade, it’s going flex and move off line as the work is pushed through.  This made a lot of sense to me at least for thick stock.


[attachimg=1]

[attachimg=2]
 

Attachments

  • BandSb-1.jpg
    BandSb-1.jpg
    55.1 KB · Views: 1,250
  • BandSb-2.jpg
    BandSb-2.jpg
    58.2 KB · Views: 1,276
Lots of pictures to share.

I worked on a mockup of a different version of the wedge tenon joint.  I made dowels using the Lie Nielsen dowel cutter, I made the gap stop complete with a pencil holder, and I measured bandsaw scrap. [cool]

[attachimg=1]

[attachimg=2]

[attachimg=3]

[attachimg=4]

[attachimg=5]

[attachimg=6]


Attachments

  • Wedge-3.jpg
    Wedge-3.jpg
    45.6 KB · Views: 1,271
  • Wedge-4.jpg
    Wedge-4.jpg
    38.1 KB · Views: 1,181
  • Wedge-1.jpg
    Wedge-1.jpg
    51.8 KB · Views: 1,172
  • Wedge-6.jpg
    Wedge-6.jpg
    54.2 KB · Views: 1,191
  • chip-2.jpg
    chip-2.jpg
    42.6 KB · Views: 1,196
  • chip-1.jpg
    chip-1.jpg
    50.3 KB · Views: 1,350
[attachimg=1]
[attachimg=2]
[attachimg=3]
[attachimg=4]
[attachimg=5]
[attachimg=6]
[attachimg=7]
 

Attachments

  • einst_puzz4.jpg
    einst_puzz4.jpg
    14.4 KB · Views: 1,183
  • Arch_puzz3.jpg
    Arch_puzz3.jpg
    86.8 KB · Views: 1,324
  • einst_puzz3.jpg
    einst_puzz3.jpg
    13.4 KB · Views: 1,239
  • Arch_puzz2.jpg
    Arch_puzz2.jpg
    80.4 KB · Views: 1,167
  • einst_puzz2.jpg
    einst_puzz2.jpg
    15.9 KB · Views: 1,163
  • Arch_puzz1.jpg
    Arch_puzz1.jpg
    84.5 KB · Views: 1,174
  • einst_puzz1.jpg
    einst_puzz1.jpg
    19.3 KB · Views: 1,292
Luke - Take my musings with a grain of salt or two because it's been a while since I've done wedged through tenons....

Shouldn't the tenon width at the shoulder be a fairly snug fit into the mortise base?

I'd also think it might work better if the saw kerf for the wedge was to the inside edge of your relief hole.

since you are essentially prototyping the joint and can see the exposed joint, once you slide the tenon in you should be able to dial in the wedge size, angle and length since you can see it from the side.
 
rvieceli said:
Luke - Take my musings with a grain of salt or two because it's been a while since I've done wedged through tenons....

Shouldn't the tenon width at the shoulder be a fairly snug fit into the mortise base?

I'd also think it might work better if the saw kerf for the wedge was to the inside edge of your relief hole.

since you are essentially prototyping the joint and can see the exposed joint, once you slide the tenon in you should be able to dial in the wedge size, angle and length since you can see it from the side.

No salt needed.
Yes.  The tenon width should be as snug as possible.  I'm laying out the pieces now and I am working to get the tolerances tight.
A couple things.  1) Even with the sloppy fit it was solid.  2) There will be 2 planks laminated to that plank before the wedges are set.

Below (in red) is what I think you are saying.  That might be better.

That is true about wedge angles and I am trying to wrap my warped brain around the problem.  Not that I'm going for perfection, but this is a very forgiving joint.

[attachimg=1]

[attachimg=2]
 

Attachments

  • Dim-1R3.jpg
    Dim-1R3.jpg
    38.9 KB · Views: 1,144
  • Dim-1R4.jpg
    Dim-1R4.jpg
    38.8 KB · Views: 1,150
Although it's not what's in the book, maybe I should drop the hole until it is tangent with the shoulder line.  In my photo looking into the joint, the wood split below the dowel hole.

Ideally you want to have the width of the top of the wedge equal to the width of the outside tenon slice after they are cut flush with the top.
 
[member=3192]rvieceli[/member]
Thanks for having me run the mock-up again.  It performed much better.  I had planed on offsetting the tenon slice as you suggested but forgot.  I moved the dowel down to the shoulder level.  I also used the production wedges.  They are narrower than the mock-up.

I was concerned when I was setting the wedges because I heard a loud split!  I couldn't find anything in the tenon.  I was a wedge that split.

[attachimg=1]

[attachimg=2]

[attachimg=3]

[attachimg=4]

[attachimg=5]


Attachments

  • R2-1-5.jpg
    R2-1-5.jpg
    88 KB · Views: 1,107
  • R2-1-4.jpg
    R2-1-4.jpg
    85.7 KB · Views: 1,148
  • R2-1-3.jpg
    R2-1-3.jpg
    75.5 KB · Views: 1,148
  • R2-1-2.jpg
    R2-1-2.jpg
    83.6 KB · Views: 1,181
  • R2-1.jpg
    R2-1.jpg
    71.8 KB · Views: 1,083
Had another thought on the slot placement...
I think this is correct.

[attachimg=1]
 

Attachments

  • R4.jpg
    R4.jpg
    45.7 KB · Views: 1,209
[attachimg=1]

[attachimg=2]

[attachimg=3]

[attachimg=4]

[attachimg=5]
[member=21412]bkharman[/member]
 

Attachments

  • Arch-3B.jpg
    Arch-3B.jpg
    99.9 KB · Views: 1,070
  • einstPL2.jpg
    einstPL2.jpg
    40.6 KB · Views: 1,033
  • ArchPL2.jpg
    ArchPL2.jpg
    53.1 KB · Views: 1,082
  • einstPL1.jpg
    einstPL1.jpg
    45.6 KB · Views: 1,090
  • ArchPL1.jpg
    ArchPL1.jpg
    52 KB · Views: 1,008
Two legs squared. Two legs in clamps.

Mortises and holes tomorrow.

[attachimg=1]
 

Attachments

  • LegFull-1.jpg
    LegFull-1.jpg
    104.1 KB · Views: 988
iamnothim said:
[attachimg=1]

[attachimg=2]

[attachimg=3]

[attachimg=4]

[attachimg=5]
[member=21412]bkharman[/member]

I guess I am still the only one playing!!  I didn't spend all night looking but I did spend a while killing brain cells looking at your pics!  Problem is that I think I am making up stuff as the "joke". Maybe the jokes on me! 

I thought I had you at "Texas Dozuki" meaning you bought a bigger one even though it was the same pic from earlier but just zoomed in but that pic was after your post starting your mind bending contest.

My wits won't let me take a hint but you definitely have driven me mad my friend!!

Cheers. Bryan.
 
@ Luke,
I have not joined in the search, and so, certainly have not joined in the contest.  This is not an excuse, but I have been so busy learning from this thread, I would not feel comfortable looking to receive monetary compensation from any such discovery to be a reward. I will, of course, enjoy the joke, even if it is all on us.

To me, this has been a truly amazing lesson from the very beginning.  AND, it has continually gotten better with each of the stages you have gone thru.  I have read other manuals that have been exceptionally well written and presented in the past, and have saved into print for references.  Christoferson, Work and Burrell immediately come into mind for their own excellent presentations.  I have saved many manuals from them.  I have gone thru this thread with as much, if not more, scrutiny as any of the most helpful manuals mentioned.  I have lived your agony and sweated along with you.  This thread I am storing along with, and in the same folder as those other informational efforts.

Tinker
 
Back
Top