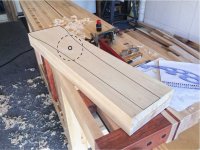
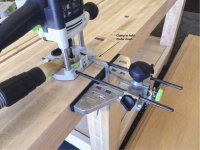
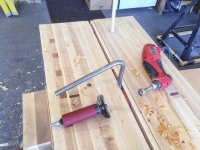
Split Top Roubo Bench Build

iamnothim said:
I will get that router sled widget that was recommended in an earlier post
I like that better than making one.

Luke, if you are talking about the sled that goes with the CXS rails, I am wondering if it is too short.  You might end up throwing a box sled together anyhow.  I have done that for a couple of very large trays and it only takes a few minutes to make.

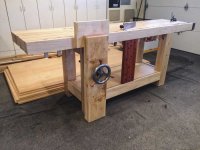
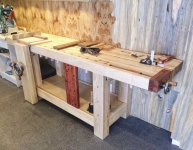
I am really going to miss this thread when you put the final stitches together.  It is my first and last stop for every day.  You have done a really fine job on the bench and just as fine a job of putting together a terrific educational discussion.

You have mentioned several times about your own impatience.  I think you have shown a great lack of "impatience" thru out this entire project.  You will enjoy the final entity for years to come. We have, all who have joined in this series of posts, enjoyed your journey and the ghosts will be peeking over your shoulder for many moons as you continue to enjoy.
Tinker

 
iamnothim said:
bkharman said:
Luke. That thing looks amazing!!

I know you knocked yourself down every once and a while during this build, but you can be very proud of what you have done. It looks awesome.

I bet two thirds of the people on this forum wouldn't attempt a project like this... Myself included at the moment.

Like others have said, documenting this and sharing with us all is an incredible feat.

Enjoy it and I raise my Maple Bacon bourbon to you my friend.

Cheers. Bryan.

Now, with all the materials and how to videos, if I can do it  so can ya’ll.  I consider the Mark, The W Whisperererer, Spagnolo’s plans and videos as important as wood in the build.  Benchcrafted sends you a nice roll of schematics, but they do no show you how to build the bench.  Just have the schematic  for the shop wall.  For $100 The WW Guild package is a steal.

Luke,  You certainly have outdone your self both in your build and your documentation.  You won't believe how you ever got anything done without it. 
Nothing against Marc Spagnolo, but Benchcrafted includes over 100 pages of comprehensive instruction with the drawings.  The best plans I've ever followed and completely accurate. 
Anyhoo,  just thought I'd add this minor correction to this otherwise stellar thread!  Cheerio, mate!

4432266261_631ccbc9c4_o.jpg
 
Excellent work, Luke.  Really well done and documented!  A big thanks for sharing this adventure with the rest of us!

neil
 
Jim Kirkpatrick said:
Luke,  You certainly have outdone your self both in your build and your documentation.  You won't believe how you ever got anything done without it. 
Nothing against Marc Spagnolo, but Benchcrafted includes over 100 pages of comprehensive instruction with the drawings.  The best plans I've ever followed and completely accurate. 
Anyhoo,  just thought I'd add this minor correction to this otherwise stellar thread!  Cheerio, mate!

For the way I learn, there's nothing better than 10 hour of video.  I think it's cool you built an incredible bench from paper.
I think the plans came with the vise kit.  I have a tube with large plans in it, however I have not looked for a .pdf file.

It's also nice that Marc answers my emails. [smile]

 
Chop Blank

3 1/2" thick
36 1/2" tall
9" taper to 5 1/2" wide

[attachimg=1]
 

Attachments

  • chop-blank_Illus.jpg
    chop-blank_Illus.jpg
    84.1 KB · Views: 1,652
It actually works!
Glides and everything.  I need to do some planing so the top of the chop is tight. It's about 1/16" open.

The stains are from some cleaner I used for grease spot that hasn’t dried.
I need to trim the top, bottom, and chamfer the edges.  I was originally going to taper the chop, however after installation I like the mass.  It's going to stay rectangular.

[attachimg=1]
 

Attachments

  • chop-done-1.jpg
    chop-done-1.jpg
    101.9 KB · Views: 1,641
This chop looks better.
It'll be time to flatten as soon as I order the gear.

[attachimg=1]
 

Attachments

  • bench-4.jpg
    bench-4.jpg
    109.9 KB · Views: 1,376
You are the MAN!  I am really going to miss this thread, however, can't wait to see what you do with the bench and start another.  Kudos for sharing everything.  Warm regards, Bill
 
Billedis said:
You are the MAN!  I am really going to miss this thread, however, can't wait to see what you do with the bench and start another.  Kudos for sharing everything.  Warm regards, Bill

Thanks Bill !

I'm going to take a break from Large Things.  I'm beat.
I was going to finish some closet doors for my son's room, but he's employed.
The there are the rest of the garage cabinets.  With I should finish.
But those are big things..

I think I'll build something like this for under the bench top.

[attachimg=1]
 

Attachments

  • Screen Shot 2015-06-22 at 7.54.56 PM.png
    Screen Shot 2015-06-22 at 7.54.56 PM.png
    695.8 KB · Views: 1,428
This looks even better...

First a story.  I was so excited about cutting the gap-stop notch-ramp that.... yes, I cut them on the wrong side.  Had to cobble the pencil holder back together.  One more task.... at least I think it's one more.  Drill 3/4" holes for the holdfasts.

Now this looks like a project.

[attachimg=1]
 

Attachments

  • Screen Shot 2015-06-22 at 8.31.31 PM.png
    Screen Shot 2015-06-22 at 8.31.31 PM.png
    1.7 MB · Views: 1,373
It was time to drill holes in the slab for the "Holdfasts"
This was tricky because I'm not too steady with a hand drill.  As such, I picked up a 3/4" plunge router bit with a long shank and chucked it into the OF1400.

Good thing I tested it on some scrap, because there's no way to hold the router freehand and get a good hole.  Even with the edge guide it wanted to walk.

A handy Festool quick clamp remedied that problem.  Luckily the router base was within the clamp's reach.

The router got me about 1 1/2" deep out of 4".  I tried a forester bit with an extension.  It went through, barely.  Then the set screws on the extension gave way and I had to gently fish the lodged bit out without munging up the hole.  Next I tried a speed bit.  It went through but it was taxed to the max.

I called the Major to see if he had a power drill with a 1/2" chuck.  Yup.  I'm going to pick up a large 3/4" brad point bit with a 1/2" shank.  I used the same brand for some half inch holes and it went right through.

[attachimg=1]

[attachimg=2]
 

Attachments

  • SlabHoles-4.jpg
    SlabHoles-4.jpg
    34.8 KB · Views: 1,293
  • SlabHoles-3.jpg
    SlabHoles-3.jpg
    46.7 KB · Views: 1,299
Edit: Make the video reappear

It's a nice bench.  Right?

WRONG.

Here is a nice bench!

16/4 Hard Maple Slabs !!!!
16/4 !!!

I must have missed the True Value Hardware coupon for SIXTEEN/FOUR hard maple.

 
I figured since I have the bench I should make a shooting board.
What an amazing tool.  I never imagined how great it is to have one.

I will be receiving a good sized box from LN.  Hey!  A guy's got to accessorize.
Bridge City Tools too [eek]

[attachimg=1]
 

Attachments

  • 5MadLivPanoA-1.jpg
    5MadLivPanoA-1.jpg
    111.1 KB · Views: 1,179
Couple of thing..

Just sold the TS75.
It was too cumbersome for me.  I missed the nimble TS55, plus I tired of Big Timber.
At this point little sticks are just fine.  Today I took a bunch of scrap maple and some new quilted maple and I cut all the stock to make a Paul Sellers "Craftsman Lamp" project.  Yup.  Little sticks.
I ordered a TS 55 from Tom and a Tenryu PSW-16052CB2TK blade from Amazon.  It has a ridiculous 1.6mm kerf and comes with a matching Riving Knife.  It will be interesting to try it.

I received four DMT 8" x 3" diamond plates.  Course, Fine, X-Fine, XX-Fine.  Now I have to learn how to use them.
I've owned a Tormek for about 10yrs, but I think I can reach another level with these.  At least I hope so.
It'll be handy for the LN Low Angle Jack package that should be here next week.  I was having a heck of a time
planing the quilted maple.  I sharpened the Veritas PM-V11 iron on some stores I had and it helped a lot.  I'll read up on the DMT's and see if it get better.

A couple posts back I talked about the holdfast holes in the slab.  I finished 3 of them but I stopped and ordered a 3/4" brad point bit.
Today the Gramercy Holdfasts arrived.  (Hey.  A guy's got to accessorize)  [member=3220]Jim Kirkpatrick[/member] tipped me to the fact that the slab is too thick and needed a larger counter bore hole on the bottom for the holdfasts to work.  To do this I filled the hole with a 3/4" dowel and used a 1" forstner bit from below.  It worked great!  Then I used an air cut-off saw and made some notches in the back of the holdfasts.  The holdfasts now hold fast.

[attachimg=1]
 

Attachments

  • holdfast-1.jpg
    holdfast-1.jpg
    111.6 KB · Views: 1,106
Great fix, Luke!  I'll have to try the counter bore thing....if I ever get around to cleaning off me bench top.  (Yeah right!)
 
Jim Kirkpatrick said:
Great fix, Luke!  I'll have to try the counter bore thing....if I ever get around to cleaning off me bench top.  (Yeah right!)

Ah Dude....

I have good news for you.
You'll be working on the bottom of the bench top.
 
As we wrap things up I thought I'd give The Major a proper introduction.

[attachimg=1]
 

Attachments

  • majorTom-1.jpg
    majorTom-1.jpg
    106.2 KB · Views: 1,727
I move the Roubo to it's final resting spot.  I still need to flatten it.
I have postponed building a tool chest in favor of an easier project.  Paul Seller's craftsman lamp.
Lots of little pieces and little joints.  Other than cutting the stock on the band saw everything is by hand.
Note:  Paul cut his stock on a band saw.  Yes he has power tools.

I built a shooting board.  It's the greatest.  I have all the stock cut and planed to spec.  The shooting board put a perfect 90 across the end grain on all pieces.  I bought a 1970's Record plow plane on eBay.  It had not been used and there wasn't a fleck of rust to be found. Includes 10 cutters.  $125.  New Veritas plow plane $420

I also bought a Diston dove tail saw for $50 Has to be 50 years old.  And an old Stanley saw set in perfect condition.  I'm liking the old tools.  Watching a Paul Sellers video on how to sharpen the saw.

Speaking of sharpening.  Th DMT stones arrived and I can put an edge on a tool that is significantly better than the Tormek.  It also much easier.  No real set up involved.

Starting the lower cabinets in a few days.

[attachimg=1]

[attachimg=2]

[attachimg=3]
 

Attachments

  • bnchmove-1.jpg
    bnchmove-1.jpg
    137.3 KB · Views: 1,550
  • bnchmove-2.jpg
    bnchmove-2.jpg
    138.7 KB · Views: 1,721
  • Screen Shot 2015-07-01 at 10.50.39 AM.png
    Screen Shot 2015-07-01 at 10.50.39 AM.png
    1.4 MB · Views: 1,638
Bench looks great Luke!  Love the lamp!  Maybe it's just the angle but your buddy, "The Major" bears a strong resemblance to yours truly.  My wife thought it was uncanny.  In any event, good looking fella!
 
Back
Top