Split Top Roubo Bench Build

iamnothim said:
TS-75 update.
Straight away.... the new saw has a lot more power, cuts cleaner and quicker.
Finally

Woo Hoo!

Tom

EDIT:
or as we say in Texas, YEE HAW!
 
[attachimg=1]

pictures and illustrations tomorrow  [crying]
 

Attachments

  • Arch2.jpg
    Arch2.jpg
    34.3 KB · Views: 1,438
iamnothim said:
I added a L-N low angle jack...

Great tool, it'll come in handy for flattening that top. It'll be a workout. Keep it sharp and crayon some paraffin on the bottom of the jack to reduce the friction and keep it moving smoothly.
Tim
 
Glad you got the real 75 back in your possession. It is an awesome saw for almost anything.

Tell me how your extra blades work out for you.

Cheers. Bryan.
 
I'm happy that the new TS75 is working for you. Like I said earlier, my TS75 with the universal blade had no problem cutting 3/4 "hard" maple. I also have the panther blade for it and then I have a TS55R with the fine blade.

I'm still trying to decide what would be more benificial to start my Roubo bench build, either the Powermatic drill press or the DeWALT DW735 planner and a Byrd Shelix cutter head for my 8" Delta jointer. The drill press would not need to be upgraded anytime soon, but I will definitely upgrade the planner to a full size version once I have a new shop. The easiest answer is to get everything, but I've spent a lot of money lately on this hobby. [doh]

Anyway... I'm looking foward to seeing your progress on the bench.
 
Hi Daniel,
First thing (to everybody).  I am, at best, a ham-n-egger that bumbles my way through projects.  This will become evident in my next post.

You asked, here’s my two cents.  The surface planer is essential.  The Shelix, for the planer, it not.  Not sure about the jointer.  I wish I had a jointer.  Fact is, I ordered a Shelix and returned it before opening the box.  Too damn expensive.  Aftermarket cutters are working fine.  I bought my DW735 on CraigsList with a roller stand and saved about $200.

I have a very big question that will get answered soon.  Will the DW735 tractor wheel thingies have enough power to pull the slab through the machine?  (The front slab is very heavy and the rear is bigger.)  Or, will I have to push it?  If so will that be a disaster?

Correct-a-mundo on the drill press.  My PM2800B is like leather seats.  You can get to town in comfort without them.

What I do think you will want is the Festool 492610 - Router Template System. Tom just shipped mine so I haven’t used it.  There are many many mortises and channels to auger out in this project and I think this will be a big help.  I will post my experiences with it.

Another is a rabbet block plane of skewed rabbet block plane.  After watching Marc’s video I think it’s essential for a truly tight joint.

Thanks for the post.

[attachimg=1]
 

Attachments

  • Screen Shot 2015-04-15 at 8.37.21 AM.png
    Screen Shot 2015-04-15 at 8.37.21 AM.png
    1.1 MB · Views: 1,550
This is classic Luke.  Not sure if it’s my meds or the dozen or so ECT treatments I had a few years back.

I had a lot of trepidation about smoothing the slab with a hand plane.  I’m not that experienced with hand tools.  Probably why I gave up golf 15 years ago.  The frustration takes it toll.  Unlike golf, I will soldier on through the the errors and try to develop the finesse necessary to produce good results.  I am please that I am slowing down and taking my time figuring out what is happening.

The slab.
What was supposed to happen after lamination is I was to smooth the bottom of the slab.  Then turn it over and use that surface as the reference and run it through the surface planer.

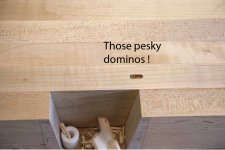
I was getting tight on lumber so I domino’d two pieces together to make a couple planks.  I though the dominos were buried enough, after trimming the plank not to show. Wrong.

Yesterday I start planing.  Low and behold, surprise, domino pockets.  So I’m thinking “ No big deal.  I’m working on the bottom of the slab.”

And then I noticed it…  I had decided to use the David Barron leg joinery method and I cut the dovetail sections oriented such that I was working on the TOP of the slab.

A couple of things in no particular order.
The It’s just a workbench” mantra. I can’t buy that.
Get Sipo dominos and turn failure into a feature.  Can’t buy that either. Slap some planks and wedges on and turn it into the rear slab.

Then there’s the fact that I am getting very close, too close to the final dimension just hand planing the top surface.  I blame me.  Marc says leave 1/2”.  I though “ Gee, that’s a lot of material.  8mm (1/3”) ought to be enough.  When you build this bench.  Listen to Mark.  Even with dominos, the boards will slip during glue-up.

[attachthumb=8]

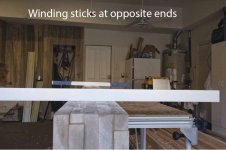
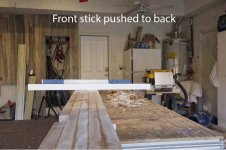
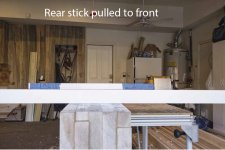
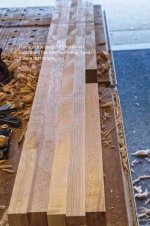
The only thing I can do is continue to flatten the top and hope I leave 102mm of meat.  Below are winding stick photos.  I need to wrap my head around them to determine the end I should plane.

[attachimg=2]

[attachimg=3]

[attachimg=4]

[attachimg=5]

[attachimg=6]

[attachimg=7]
 

Attachments

  • einst1.jpg
    einst1.jpg
    40.1 KB · Views: 205
  • Screen Shot 2015-04-15 at 9.00.17 AM.png
    Screen Shot 2015-04-15 at 9.00.17 AM.png
    475.9 KB · Views: 1,412
  • Slab_C-7.jpg
    Slab_C-7.jpg
    209.8 KB · Views: 1,345
  • Slab_C-6b.jpg
    Slab_C-6b.jpg
    243.9 KB · Views: 1,396
  • Slab_C-4.jpg
    Slab_C-4.jpg
    134.7 KB · Views: 1,359
  • Slab_C-5.jpg
    Slab_C-5.jpg
    158.1 KB · Views: 1,359
  • Slab_C-3.jpg
    Slab_C-3.jpg
    115 KB · Views: 1,368
  • Slab_C-2b.jpg
    Slab_C-2b.jpg
    159.9 KB · Views: 279
I’ve made some good progress with with the back third of the slab. I am using my Starrett and squaring off the left side. I’ll check the right too. They are pretty close so far. I’d identify the high spots on the top, color them, and take them down working a little at a time. I’m getting the best results with my adj mouth block plane. I’m not getting a feel for what the No. 5 is doing.  This is probably wrong since the lumber is long and the bed of the plane is very short, but it seems to work.
(Also posted to Lumberjocks)

[attachimg=1]
 

Attachments

  • Slab_D1.jpg
    Slab_D1.jpg
    80.4 KB · Views: 1,329
Not sure if you have a tooth plane iron but they work great for rough work.  I made a bench a couple years ago out of black locust and it was the only way to plane that kind of wood.  Locust  has very interlocking grain and goes in every direction.  I think you said you bought a ln low angle jack,  i know that they make a tooth plane for it and it works great.  Thats what I used on my bench. 
 
I have good news. I did the geometry and calculated the stock for my legs AND, I was able to flip the joint. (make a larger one)  The bottom is back to being a bottom and the top will have no unsightly domino pockets. [smile]

The width of the joint is slightly larger but using 140mm legs I’ll have a 12mm shoulder on each side of the tenon
 
iamnothim said:
I have good news. I did the geometry and calculated the stock for my legs AND, I was able to flip the joint. (make a larger one)  The bottom is back to being a bottom and the top will have no unsightly domino pockets. [smile]

The width of the joint is slightly larger but using 140mm legs I’ll have a 12mm shoulder on each side of the tenon

Haha.  That would drive my ocd crazy too!!!
 
So far, this thread has been a fascinating read.  It has also been very educational.
Tinker
 
Tinker said:
So far, this thread has been a fascinating read.  It has also been very educational.
Tinker
Wayne,
What fascinates me is I've posted ~20 photos of the same pieces of lumber and they've been viewed 4500 times.  [eek]

I'm humbled everyone is following my "journey"  (Over used word)
I'm entering uncharted territory now.  I've only done carpentry stuff before, not joinery.  I hope the thread continues to be educational.  It ain't Nova, but it's not Criminal Minds either.

Last night I worked on those same 5 pieces of lumber and the smoothing is looking good.  I've got about 2 feet left then a bit of tuning.

Winding sticks:  I'm checking square with my Starrett  (favorite tool) using the left side as reference. It's flat across the top.  However the winding sticks still indicate some twist.  High on the left side.  If I take the left edge down It's going to fall out of square.  I'm using the MFT al-lou-mini-yum fences as the sticks.  If you divide the length of the stick by the width of the slab you get about 5.  That means the sticks are amplifying the twist 5:1  (Or at least 2.5:1).  That's a lot.

It would be hard for someone with my abilities to plane in an 8 ft diagonal line to remove the twist.  If I set them in 1/3rd lengths of the slab, it looks pretty good.  I'm not going to mung with it.

Luke
 
Luke, I am also one with very little cabinetry experience.  Lots of rough carpentry. mostly during my apprentice years when i worked at everything, including tin work and electrical.  I hated both trades for the ams reason.  All the cutting tools were right handed.  [mad]

when working with the masons (favorite trade even tho it shortened my height from 7 feet tal down to bumping my knee caps with my chin) i was the one who did all of the scaffolding construction and most complicated form work.  Those ops did not need accuracy, but they had to withstand a lot of weight as well as strain in all directions.  Today, now i am 39, the eyes ain't so sharp, even tho i no longer wear glasses most of time since getting rid of my cadilacs, the hands are more shaky than ever and I carry a pair of thumbs in my pocket at all times ("thumbs" are maye recognized as small channel lock pliers >>> i am never without them)

You have a lot of patience to make things purfic, soon you will be doing them perfect.  I look for this thread first thing every time i turn on the computer.  If there are other replies i want to attend to, i still check this one first any time it pops up.

Thank you for keeping the story going.
Tinker
 
iamnothim said:
This is classic Luke.  Not sure if it’s my meds or the dozen or so ECT treatments I had a few years back.

I had a lot of trepidation about smoothing the slab with a hand plane.  I’m not that experienced with hand tools.  Probably why I gave up golf 15 years ago.  The frustration takes it toll.  Unlike golf, I will soldier on through the the errors and try to develop the finesse necessary to produce good results.  I am please that I am slowing down and taking my time figuring out what is happening.

The slab.
What was supposed to happen after lamination is I was to smooth the bottom of the slab.  Then turn it over and use that surface as the reference and run it through the surface planer.

I was getting tight on lumber so I domino’d two pieces together to make a couple planks.  I though the dominos were buried enough, after trimming the plank not to show. Wrong.

Yesterday I start planing.  Low and behold, surprise, domino pockets.  So I’m thinking “ No big deal.  I’m working on the bottom of the slab.”

And then I noticed it…  I had decided to use the David Barron leg joinery method and I cut the dovetail sections oriented such that I was working on the TOP of the slab.

A couple of things in no particular order.
The “It’s just a workbench” mantra. I can’t buy that.
Get Sipo dominos and turn failure into a feature.  Can’t buy that either. Slap some planks and wedges on and turn it into the rear slab.

Then there’s the fact that I am getting very close, too close to the final dimension just hand planing the top surface.  I blame me.  Marc says leave 1/2”.  I though “ Gee, that’s a lot of material.  8mm (1/3”) ought to be enough.  When you build this bench.  Listen to Mark.  Even with dominos, the boards will slip during glue-up.

[attachthumb=8]

The only thing I can do is continue to flatten the top and hope I leave 102mm of meat.  Below are winding stick photos.  I need to wrap my head around them to determine the end I should plane.

[attachimg=2]

Luke,  When I read you were going to use dominos to aid in alignment I meant to caution you.  I did the same thing myself!  Only I was fortunate to where the exposed domino was in the offcut and not the top itself. 
4471092682_9250f9bc30_b.jpg


For do-over sake:  I think an easier more foolproof way of doing it is to use brads, and snip the heads off as shown.  Just make sure you place them more towards the center of the board so as not to expose them later during power or hand planing. 
16991812440_32e9b97283_o.jpg

16991812870_aba2156013_o.jpg


In any event, I'm glad you were able to work things out.  Worst case, with your inlay skills, you could have covered it with a bowtie or something more creative.  Most important tip is: Take your time.  You're going to be looking at it for the rest of your life, don't rush it only to kick yourself for it later! [eek]
 
Jim Kirkpatrick said:
Luke,  When I read you were going to use dominos to aid in alignment I meant to caution you.  I did the same thing myself!  Only I was fortunate to where the exposed domino was in the offcut and not the top itself. 

For do-over sake:  I think an easier more foolproof way of doing it is to use brads, and snip the heads off as shown.  Just make sure you place them more towards the center of the board so as not to expose them later during power or hand planing.

In any event, I'm glad you were able to work things out.  Worst case, with your inlay skills, you could have covered it with a bowtie or something more creative.  Most important tip is: Take your time.  You're going to be looking at it for the rest of your life, don't rush it only to kick yourself for it later! [eek]
Hi Jim
Yes, I have to hit the slow button and it's helping.  I've spent many days flattening the slab.

My problem wasn't the side reference dominos.  The ones that became exposed were on the ones I used to laminate two edges to give me a taller plank.  BTW:  I will have bowties because I'm implementing David Barrons leg joint.  The contrasting wedges and large dove joint look, IMO, neato.
 
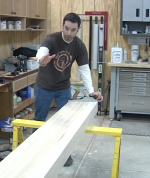
I think I’ve flattened the slab and it’s ready to flip and put through the surface planer.  I shall call my friend Major Tom (Ret. US Army) to help.

I am square to the left face and I am flat down the middle. Measured using my FS/1900 on edge.  The winding sticks middle to middle look good but there is a small amount of twist end to end.  When I flipped the slab onto the planed side the belly has a bit of rock.  1/16”

T.he Major better get here quick because I’m hearing the plane police again “Put the plane down Luke!” “Put the plane down”  “Don’t taze me Bro! Don’t taze me.”

I’ve ordered a Wood River No. 4 1/2.  Some people swear by WR some think they are junk.  For the price I’m giving them a try.  I cxl’d the order for a L-N low angle jack plane.  The old Stanley is working fine and I’ve been spending $ like a drunken Marine.  I’ll get one down the road.

“Put the plane down!”

[attachimg=1]

[attachimg=2]
 

Attachments

  • IMG_1655.JPG
    IMG_1655.JPG
    2.1 MB · Views: 2,828
  • IMG_1653.JPG
    IMG_1653.JPG
    1.7 MB · Views: 2,472
[member=3220]Jim Kirkpatrick[/member]

Jim,  Here's an illustration of the problem.  Now that it's the bottom it's not a problem.
The dominos worked great laterally to register the bottom of the slab.  If I wasn't so freaked out when applying the glue the planks wouldn't have slipped as much.

[attachimg=1]
 

Attachments

  • Lam.jpg
    Lam.jpg
    407.6 KB · Views: 4,786
Back
Top