vkumar said:I ordered mine thru Carbide Processors in metric. They shipped 2 days ago.
I bought mine through CP also, but the shipping # that they sent me two days ago is still not recognized by UPS. Hope they make it here soon.
vkumar said:I ordered mine thru Carbide Processors in metric. They shipped 2 days ago.
fritter63 said:marcustait79 said:I made these parallel and crosscut guides on my desktop CNC out of scrap plywood and they work great! [smile]
Saved $300 by making them on a $10,000 CNC machine! [emoji41]
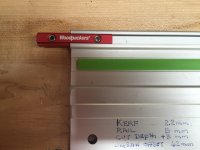
rich024 said:Not sure why people can't get the metric. I ordered and received metric guided this week. Used them once and like them better than the Festool guide rails. Easier to set up and and lays flat on the piece instead of hanging off the edges. Happy with my purchase.
")
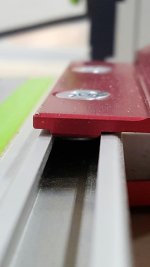
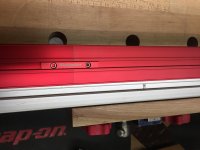
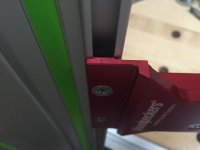
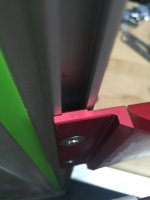
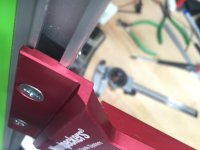
Claimdude said:My son and I both got this one time tool. He used his last week and noticed that the bracket protrusion that should fit in the groove on the top of the rail is too wide for the groove. I hadn't set mine up so went and checked the fit on mine to the rail and found mine also sits proud of the rail because the protrusion is too wide to sit in the groove as it should. The picture below is the pic my son took of his bracket/rail problem. My looks identical. Anyone else had this problem?
Jack
Zeusman said:Hey Guys this is Wayne. I'm one of the tool designers here at Woodpeckers. Let me try to respond to the question about the Main Body Bracket. The bottom of the bracket was designed with a wedge shape. That feature is not suppose to fit in the track. It was designed to "wedge" in the track as to always center when the screws are tightened. It is the same feature we use on multiple Woodpecker products. The flip stops on the Parallel Guide System also have that feature. I hope this explanation helps.
Zeusman said:Hey Guys this is Wayne. I'm one of the tool designers here at Woodpeckers. Let me try to respond to the question about the Main Body Bracket. The bottom of the bracket was designed with a wedge shape. That feature is not suppose to fit in the track. It was designed to "wedge" in the track as to always center when the screws are tightened. It is the same feature we use on multiple Woodpecker products. The flip stops on the Parallel Guide System also have that feature. I hope this explanation helps.
Cheese said:Zeusman said:Hey Guys this is Wayne. I'm one of the tool designers here at Woodpeckers. Let me try to respond to the question about the Main Body Bracket. The bottom of the bracket was designed with a wedge shape. That feature is not suppose to fit in the track. It was designed to "wedge" in the track as to always center when the screws are tightened. It is the same feature we use on multiple Woodpecker products. The flip stops on the Parallel Guide System also have that feature. I hope this explanation helps.
[member=34727]Zeusman[/member]
[welcome] to the FOG Wayne, it's great to be able to talk with a Woodpeckers tool designer and get design criteria/decisions directly from the "horse's mouth". It's what I've been advocating Festool should consider for the last 10 months. [poke] Festool
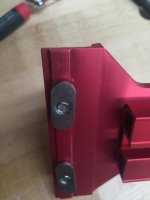
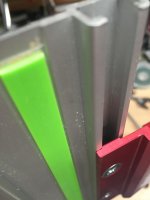
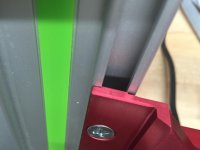
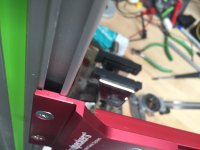
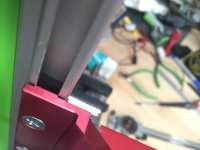
When I looked at the [member=10616]Claimdude[/member] photo and then read your explanation, something just didn't seem right, so I went downstairs to take a closer look. What I noticed is that there is indeed a 20-25 degree taper on both sides of the part in question. The original photo doesn't reveal the taper but that's just because of the perspective of the photograph.
I've attached below a photo of the part which clearly shows the tapers that would facilitate the self centering feature on the track rail. Thanks for your input and I hope you stick around. Woodpeckers questions come up on a regular basis. [thumbs up]
[attachthumb=1]
blakjak220 said:Hey Cheese,
Have you had a chance to actually try your bracket on the rail and use it for a little bit? Just wondering if you got yours to work correctly without any slippage. Thanks
blakjak220
Cheese said:blakjak220 said:Hey Cheese,
Have you had a chance to actually try your bracket on the rail and use it for a little bit? Just wondering if you got yours to work correctly without any slippage. Thanks
blakjak220
No unfortunately I have not, I'm in the middle of a bathroom gut so I haven't been breaking down sheet goods recently.
I assembled the guide system and then put it aside. Maybe I'll try to mount them to the rail later and move the rail around and see what happens.
I'll @ you when I try the rail & guides.
Zeusman said:Hey Guys this is Wayne. I'm one of the tool designers here at Woodpeckers. Let me try to respond to the question about the Main Body Bracket. The bottom of the bracket was designed with a wedge shape. That feature is not suppose to fit in the track. It was designed to "wedge" in the track as to always center when the screws are tightened. It is the same feature we use on multiple Woodpecker products. The flip stops on the Parallel Guide System also have that feature. I hope this explanation helps.
Claimdude said:Since my TS55 rides on that channel causing it to splay outward would make my saw fit too tight.
Jack
Bohdan said:Claimdude said:Since my TS55 rides on that channel causing it to splay outward would make my saw fit too tight.
Jack
Your TS55 doesn't ride on that channel, it only rides on the other (centre) channel, this channel is only used for accessories like the parallel guides or stops but I agree that the accessory should not go in so tight as to damage the rail.