Down with the old & Up with the new

My parents always had Great Pyrenees and yes, they are quite large. But the father of the last one they had was really something. After he had fathered his first litter they found out he didn't stop growing. Of course that also meant they stopped using him to breed. But boy, did he get BIG  [eek]. He only got to be 4 years old, and when he died he was 96 cm high at the withers. He weighed almost 100 kg!  [scared] The term gentle giant was a perfect match for him. He really was. The most wonderful thing is that his owners named him Conan when he was a pup. There never was a name more aptly chosen.
 
Richard/RMW said:
[member=44099]Cheese[/member] are you taking the "outsulation" approach? I've seen some methods on YT for getting a fully airtight envelope that are really intriguing and seemingly not to hard to execute.

When we built (2010) a major frustration was getting any local contractors to do anything outside the box. They just wanted to slap up 16" OC 2-by frames and move on, can't blame them since anything new entails risk but it was disappointing. Forget about advanced framing, & spray foam was cutting edge.

Seems like changed.

RMW

Richard, I'm unfamiliar with the outsulation approach...what's that?
 
rvieceli said:
[member=44099]Cheese[/member] Looking good so far. Are they back on Monday?

Is that a Great Pyrenees in the background?

My wife's little sister and her family have two Newfoundlands and a Great Pyrenees. Wonderful dogs but BIG.

Ron

Ya Ron, it's a bit hectic here as the snow is starting to fall, but I don't worry about that so much because we're pretty well wintered in here considering the situation, except for the lack of the overhead door...2 round windows...2 sky lights...2 casement windows and a French door.
Other than that there are Boars-head weiners in the fridge and we're good-to-go.  [big grin]

The next few days will be touch & go as I still have to assemble and bury the 3" pvc conduit for the buried electrical.

Whoops...forgot to answer your question, the dog in the background is one of these. From that photo I can't tell which one as they are father & daughter and are exact copies except for their faces. Even then it's still difficult to tell at times.

[attachimg=1]

[attachimg=2]
 

Attachments

  • 11105.jpg
    11105.jpg
    436.6 KB · Views: 294
  • 11059.jpg
    11059.jpg
    289.8 KB · Views: 289
hdv said:
My parents always had Great Pyrenees and yes, they are quite large. But the father of the last one they had was really something. After he had fathered his first litter they found out he didn't stop growing. Of course that also meant they stopped using him to breed. But boy, did he get BIG  [eek]. He only got to be 4 years old, and when he died he was 96 cm high at the withers. He weighed almost 100 kg!  [scared] The term gentle giant was a perfect match for him. He really was. The most wonderful thing is that his owners named him Conan when he was a pup. There never was a name more aptly chosen.

[member=66485]hdv[/member] you've always been a person of interest...you always have some great input...keep contributing.  [big grin]  We need more like you.
 
Thanks for the kind words. This forum is one of the two online places I like the most. There's always something to learn from the experiences and wisdom others post here. People treat each other with respect too. That makes FOG a great place to be!

P.S. Conan died in the end because his heart just gave out. It couldn't keep up with that massive body of his. So sad. He was such a gentle soul. He wasn't even my dog, but I still remember him well. And that was more than 30 years ago.
 
Basically moving the insulation outside the framing to achieve a full air barrier and eliminate thermal bridging at the framing. Matt Risinger talks about it on an episode of YT Build Show.

Looking at your photo I now see what I thought was a foam panel above the foundation insulation looks more like gypsum. I thought you were insulating outside the sheathing. My bad.

Beautiful pups BTW. We aren't set up to care for canines but I always enjoy it when we get to spend time with them. Tons of love and trust in every one.

RMW

Cheese said:
Richard/RMW said:
[member=44099]Cheese[/member] are you taking the "outsulation" approach? I've seen some methods on YT for getting a fully airtight envelope that are really intriguing and seemingly not to hard to execute.

When we built (2010) a major frustration was getting any local contractors to do anything outside the box. They just wanted to slap up 16" OC 2-by frames and move on, can't blame them since anything new entails risk but it was disappointing. Forget about advanced framing, & spray foam was cutting edge.

Seems like changed.

RMW

Richard, I'm unfamiliar with the outsulation approach...what's that?
 
hdv said:
Thanks for the kind words. This forum is one of the two online places I like the most. There's always something to learn from the experiences and wisdom others post here. People treat each other with respect too. That makes FOG a great place to be!

P.S. Conan died in the end because his heart just gave out. It couldn't keep up with that massive body of his. So sad. He was such a gentle soul. He wasn't even my dog, but I still remember him well. And that was more than 30 years ago.

Ya, animals have a way of piercing that protective shield that each of us wield from time to time. I think it's because they ask for nothing...no pre-nuptials or anything of the sort, they simply & willingly offer pure love and unconditional affection, no strings attached. What form of love is more pure than that?

I find that it's a shame that the life of an animal is as short as it is. That's unfair from a selfish standpoint, but yet, maybe there is a message and a lesson in that short life time because so many of our pets have succumbed to that shortened life cycle but all have brought to us a lifetime of celebrated remembrance and that's important...although it's not always easy. 
 
Richard/RMW said:
Basically moving the insulation outside the framing to achieve a full air barrier and eliminate thermal bridging at the framing. Matt Risinger talks about it on an episode of YT Build Show.

Looking at your photo I now see what I thought was a foam panel above the foundation insulation looks more like gypsum. I thought you were insulating outside the sheathing. My bad.

Beautiful pups BTW. We aren't set up to care for canines but I always enjoy it when we get to spend time with them. Tons of love and trust in every one.

RMW

Got it Richard, I had thought about installing fan-fold but I've never used it before so I have ZERO history. I also have no idea how beneficial a R-2.5 exterior insulation will be. Maybe it's magic because it encapsulates both sides of the structure? At any rate, the windows have arrived and as fan-fold was not factored into the equation, the window depths and jamb extensions are per normal standards.

Thanks for the dogs thing [smile]...with the human children on their own, the animals do provide a missing element that softens life a bit and provides for a gentle touch-down.
 
So in the last episode I was talking about the fragility of foam insulation corners when exposed to the normal wear & tear of daily exposure to the elements, wheel barrows and the like. Once the foam insulation is coated with a 1/8" stucco coat, the foam board is pretty resilient to damage but the corners are still susceptible to damage.

My solution was to adhere 18 gauge stainless protective corners to the foam insulation that was used. The protective corners are usually used in hospitals or office buildings. Once attached to the foam, the entire assembly will be sprayed with a thick stucco coat that will make everything appear to be of the same material, all while delivering 2" of thermal isolation to the foundation.

It's a real shame to hide that beautiful 4B brushed finish under the tape and stucco coat but that's life.

[attachimg=1]

[attachimg=2]

[attachimg=3]

[attachimg=4]
 

Attachments

  • 14448.JPG
    14448.JPG
    951.8 KB · Views: 284
  • 14448a.jpg
    14448a.jpg
    866.6 KB · Views: 288
  • 14448b.JPG
    14448b.JPG
    768.1 KB · Views: 286
  • 14448cJPG.JPG
    14448cJPG.JPG
    881.9 KB · Views: 288
Looking good Cheese..
We don’t have pre-inspections as you do, at least to my latest knowledge. I learned that by watching Scott Brown Carpentry who lives in NZ for the first time. Sounds like a good investment. I saw that foam between the trusses and boards, new to me that too..
For the footings, I live in a very cold climate, at least during winter. In the more extreme I’ve noticed on concrete footings there might be 4 foam. But on garages usually 2”. They seek to burry it as low as possible, and even a strip at a slope below lowest level to hinder the frost to travel further down and in. As I did now, we (some) do footings in a material called Leca. It’s clay balls bound with concrete. Incredibly strong and since it has a lot of trapped air cavities it does also insulate very well.
Then, we tend to back fill with gravel or Leca in fluid form, covering with breathing cloth material to prevent soil to drain and mix in. This leaves the area around the footing to breathe, drain water and even insulate further.

Love the shiny corner protections - a Cheese expected treat  [big grin]. Still, you know they won’t disintegrate  [wink].

I’m curious how they solve the cladding. We make sure that any water ingress behind the cladding is secured by boards and bitumen/asphalt based flexible “foil” lead with overlap at every junction leading the water out from the wall, as low as over any footings and foam boards. This does also wind proof.

Love the dogs! They do look very alike.. even the expression of a happy face  [smile]
 
FestitaMakool said:
1. I live in a very cold climate, at least during winter. In the more extreme I’ve noticed on concrete footings there might be 4” foam. But on garages usually 2”. They seek to burry it as low as possible, and even a strip at a slope below lowest level to hinder the frost to travel further down and in.
2. As I did now, we (some) do footings in a material called Leca. It’s clay balls bound with concrete. Incredibly strong and since it has a lot of trapped air cavities it does also insulate very well.
Then, we tend to back fill with gravel or Leca in fluid form, covering with breathing cloth material to prevent soil to drain and mix in. This leaves the area around the footing to breathe, drain water and even insulate further.

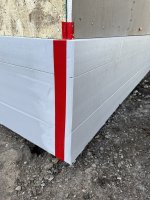
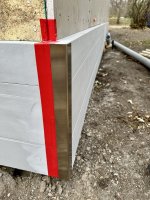
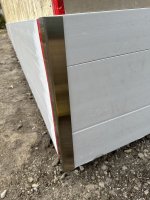
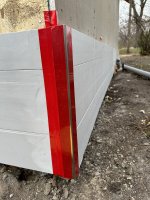
3. Love the shiny corner protections - a Cheese expected treat  [big grin]. Still, you know they won’t disintegrate  [wink].

4. I’m curious how they solve the cladding. We make sure that any water ingress behind the cladding is secured by boards and bitumen/asphalt based flexible “foil” lead with overlap at every junction leading the water out from the wall, as low as over any footings and foam boards. This does also wind proof.

5. Love the dogs! They do look very alike.. even the expression of a happy face  [smile]

Festita you've brought up some very interesting questions.  [smile]  Too many I may add.  [big grin]

1. As the winter is starting to set in, the grade around the footings is what it is until spring, the downward sloping foam board sections to prevent frost being driven further into the ground are interesting. I have 4 months to noodle on that suggestion/improvement. Renting a Toro Dingo for a day would take care of that situation.  [big grin] Curious how far that sloped foam board needs to project from the footings?

2. Leca...I'm clueless but interested, the Europeans always seem to have a head-start on some of these newer techniques/materials.

3. Ya, 18 gauge stainless corners aren't going anywhere. I actually wanted 20 gauge but couldn't find a source.

4. I don't quite follow the cladding discussion, my assumption is that the OSB will be covered with Tyvek or the equivalent before the siding is applied.

When I resided the house with clear, vertical grain cedar bevel siding, I was told Tyvek and cedar didn't play well together so I used the old standby...asphaltic felt.

The garage will be using Hardieplank bevel siding so Tyvek shouldn't be a problem. Probably just another up-charge.  [blink]

5. The dogs...what more needs to be said? The maintenance costs are high but the ROI is incredible...a person couldn't ask for more pure joy.

 
Well, I was cutting the stainless corner protectors for the foam board insulation to length and towards the end of the project I became a bit lazy/anxious and fed the blade a bit too fast into the 304 stainless corner protectors...and heard a bang...that's never a good thing.  [smile]

Just look at those beavered edges and the less than 90º angles...not good.  [sad]

[attachimg=1]

I decided to check the condition of the saw blade and sure enough it was toast. Of the 90 teeth, 29 of them were damaged or missing. This is a major issue but I don't believe a 2 second lack of judgement on my part caused this catastrophic failure.

[attachimg=2]

[attachimg=3]

[attachimg=4]

The only thing I can trace this down to is that I was cutting some 440C round stock previously with this same blade and I'm wondering if because of its hardness, it was the culprit and it started to unravel the carbide blade chips dilemma?


Attachments

  • 14459.jpg
    14459.jpg
    1.2 MB · Views: 516
  • 14458.jpg
    14458.jpg
    973.5 KB · Views: 508
  • 14456.jpg
    14456.jpg
    771.5 KB · Views: 496
  • 14463.jpg
    14463.jpg
    518.3 KB · Views: 507
Wow, that looks like a lucky escape to me.  I once smashed a double glassed patio window using my mitre saw on the patio and having a tooth come off and hit the window.

Could the piece of stainless steel have moved slightly and pinched the blade?

Regards
Bob
 
[member=44099]Cheese[/member] you seem to be lucky in that you didn't injure yourself.

LECA stands for Lightweight Expanded Clay Aggregate, apparently make by heating clay in a rotary kiln to form pellets which have about 40% of their volume as voids in the pellet. Use it like rock for backfill and you get additional voids between the pellets. Kind on interesting.

here's a UK video about its use.
=A16Z2xJ6Ih5fFEzZ

Ron
 
bobtskutter said:
Could the piece of stainless steel have moved slightly and pinched the blade?

Regards
Bob

I don't think so Bob, I think the blade was already damaged to a certain degree and when I rushed the cut at the very end, 90% of the cut was made and then the soon-to-be off-cut was grabbed by the blade and bang it went.  [embarassed]

Thinking about it now, probably more caution needs to be taken at the end of the cut when pieces are loose or nearly loose...lesson learned.
 
[member=44099]Cheese[/member]  how do you place angle against the fence of your chop saw?

Doesn’t matter much when using an abrasive blade but a toothed blade is so different.

Always makes me nervous since there is no way to satisfy the old rule of thumb to keep three teeth engaged at all times. The closest I can get is to put the corner up but that sends the edge of the stock under the fence making the angle setting less reliable. But at least until the very end there is cutting happening in two places which helps moderate the feed rate.
 
Cheese said:
The conversion is quick & easy but there are 2 issues. The wet capacity of a MIDI I is really limited and sometimes the auto shut-off tripped early...as in VERY early [mad] [mad]. I assumed it was from water splashing around the inside of the canister.
Aand here comes the utility of a spare CT 25 tub for one's MIDI/MINI.

Or a CT 48 tub for one's CT 26. For that matter.
[smile]
 
mino said:
Aand here comes the utility of a spare CT 25 tub for one's MIDI/MINI.

Or a CT 48 tub for one's CT 26. For that matter.
[smile]

And thanks for that Mino... [big grin]...a spare CT 25 tub for wet vac work would be a game changer for what I do.

I really was disappointed with the water capacity for the MIDI I. I'm used to a Milwaukee 8925 with 15 gallons capacity but the beast is heavy and bulky for many tasks. However, it will suck the chrome plating off of a bumper hitch and if I needed to drain a small pool the Milwaukee would also be on my list.  [smile]  It also has an integral water drain valve which is beyond useful.
 
Michael Kellough said:
[member=44099]Cheese[/member]  how do you place angle against the fence of your chop saw?

Doesn’t matter much when using an abrasive blade but a toothed blade is so different.

Always makes me nervous since there is no way to satisfy the old rule of thumb to keep three teeth engaged at all times. The closest I can get is to put the corner up but that sends the edge of the stock under the fence making the angle setting less reliable. But at least until the very end there is cutting happening in two places which helps moderate the feed rate.

Well [member=297]Michael Kellough[/member] it was a very interesting day, the new Evolution stainless blade arrived today and I mounted it to the saw. Cut 1...cut 2...cut 3...cut 4...BANG. WTF????

I've cut angles with this machine before since I've owned it for the last 19 years, thicker aluminum and steel angle are cut with the corner up and there is never an issue. The thinner gauge materials however seem to be a problem albeit not a consistent problem and that's really irritating.  [mad] I'm thinking an interior wooden support might ameliorate the situation. 🤷‍♂️

I immediately shut things down and I checked the teeth of the new blade and 17 were damaged.  [sad]

This now was a cause for a pause and some further thought.

Okay, the Milwaukee bandsaw was the next best option because of the normally clean cuts.

This option suddenly became the dinner winner for the thin 18 gauge stainless angles.

Something to learn everyday...and that's a good thing.  [smile]

[attachimg=1]

[attachimg=2]

[attachimg=3]

[attachimg=4]

[attachimg=5]


Attachments

  • 14494.JPG
    14494.JPG
    775.6 KB · Views: 425
  • 14495.JPG
    14495.JPG
    601 KB · Views: 425
  • 14496.JPG
    14496.JPG
    692.8 KB · Views: 438
  • 14497.JPG
    14497.JPG
    503.7 KB · Views: 430
  • 14498.jpg
    14498.jpg
    785.7 KB · Views: 432
Back
Top